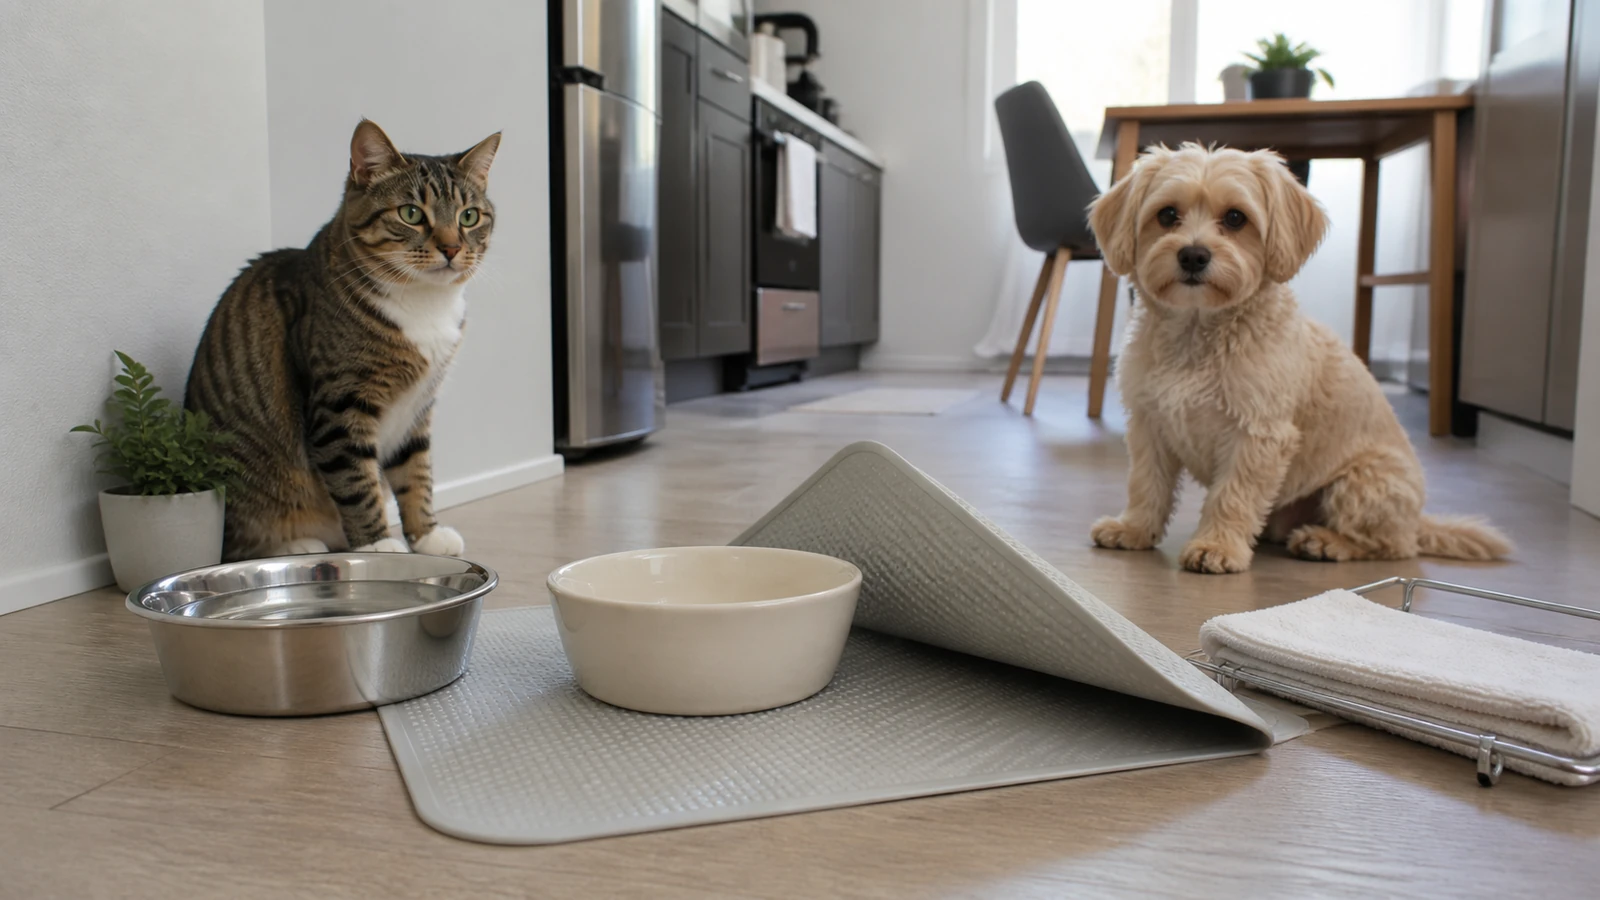
Learning how to clean pet bowls depends on the item, material, residue, and whether ordinary cleaning is enough. A bowl, slow feeder, mat, elevated stand, automatic feeder tray, and water-fountain basin can have different care limits within one feeding corner.
That matters in an apartment with a small sink, limited drying space, and a feeding mat directly on wood, laminate, or vinyl. Hidden water can remain beneath the mat, while cleaners must stay away from food, water, and pets.
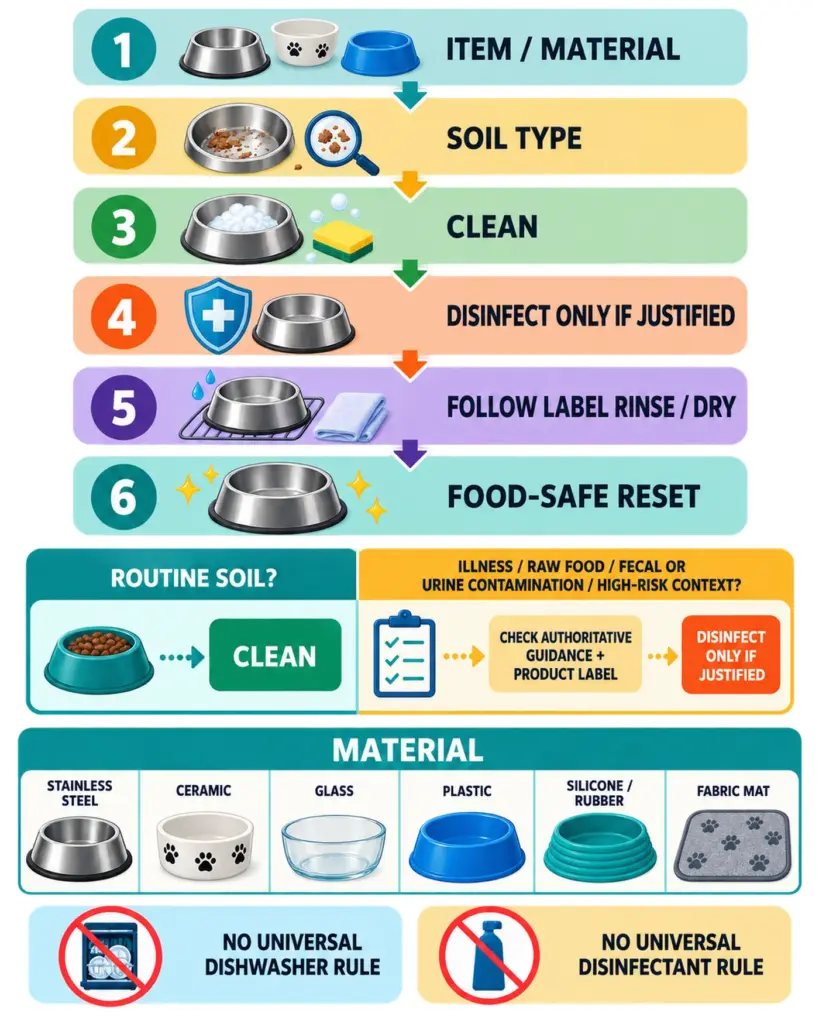
Use this sequence instead of treating every item the same:
ITEM / MATERIAL → SOIL TYPE → CLEAN → DISINFECT ONLY IF JUSTIFIED → FOLLOW LABEL RINSE / DRY → FOOD-SAFE RESET → PREVENT RECONTAMINATION
Routine cleaning is the default. Disinfection is an additional step for defined situations. Manufacturer instructions control dishwasher use and removable parts; a disinfectant label controls food-contact rinsing and drying.
Quick Answer(How to Clean Pet Bowls)
Empty the item, remove food, identify its material, and read the care instructions. Wash approved items with soap or detergent and water, using a non-scratch tool that reaches the entire surface. Rinse, then air dry or use a clean towel.
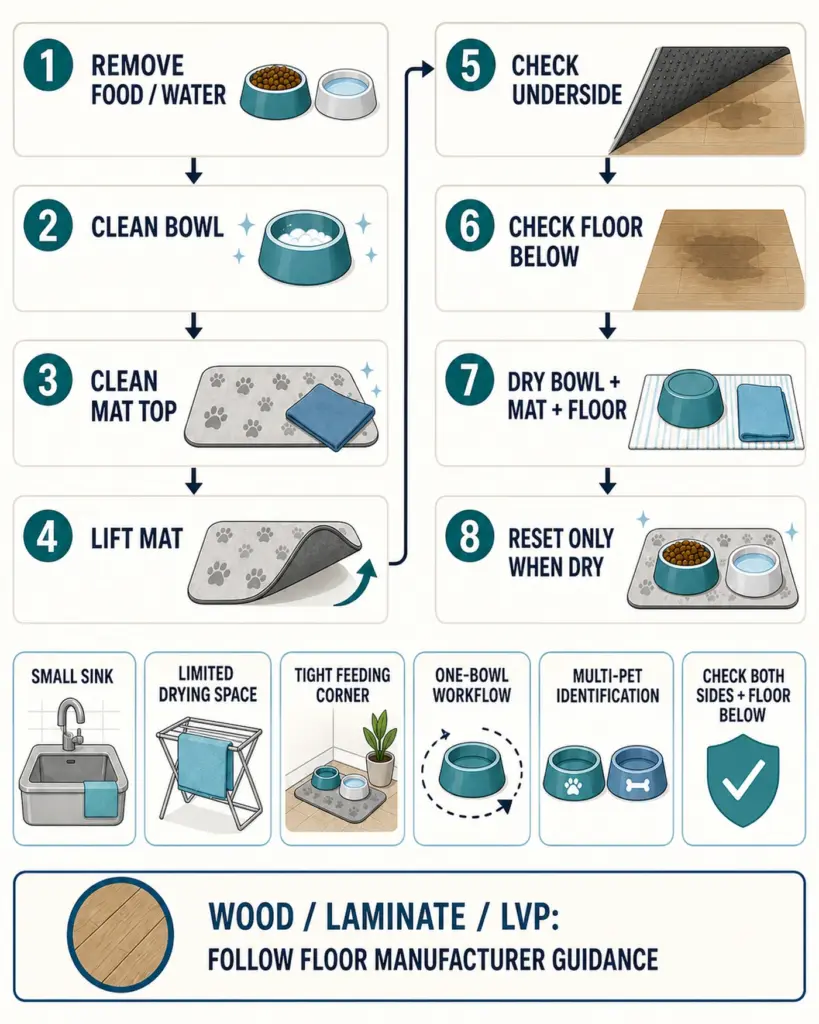
Lift the feeding mat. Clean and dry its top, underside, folds, and raised edges, and clean and dry the floor before resetting the station.
Material alone does not prove dishwasher compatibility. Coatings, designs, nonslip rings, electronics, and multi-part construction can change the instructions. An ordinary cycle can clean an approved item; not every cycle disinfects it.
Disinfect only when justified, such as illness, feces or urine contamination, raw pet-food contact, a recall, or a higher-risk household. Clean first and follow the exact product label for dilution, contact time, ventilation, pet access, rinsing, and drying. Never mix cleaning products.
Table of Contents
Start With the Item, Material, and Soil
The same visible film can lead to different decisions. Greasy wet-food residue needs detergent and physical cleaning. A slippery water-bowl film needs thorough washing and attention to seams or corners. Dry kibble beneath a mat may need simple removal followed by cleaning of the soiled surface. Raw-food residue changes the contamination boundary. Urine beside a feeding station is not an ordinary dishwashing problem.
Before washing anything, ask:
- Is this a food bowl, water bowl, mat, stand, slow feeder, feeder tray, fountain basin, pump, or electronic base?
- Is it stainless steel, glazed ceramic, glass, plastic, silicone, rubber, fabric, or a combination?
- Is the soil dry, wet, greasy, slimy, biologically contaminated, or unknown?
- Does the item have a care label, manual, dishwasher symbol, or removable-parts diagram?
- Can every washed component dry completely before it is used again?
This short assessment prevents the most common mistake: applying one favorite cleaning method to every item in the station.
Pet Bowl and Feeding-Mat Material Decision Table
| Item or Material | Routine Cleaning Approach | Dishwasher Boundary | Replace or Stop Signal |
|---|---|---|---|
| Stainless-steel food or water bowl | Use soap or detergent, water, and a non-scratch sponge or brush; rinse well | Use a dishwasher only if the exact bowl, coating, seam, and nonslip base are approved | Deep scratches, pitting, persistent rust, failed seams, or a separating base |
| Glazed ceramic bowl | Clean the complete glazed surface and dry it; prevent impacts during washing and storage | Product-specific; painted or decorated bowls may have narrower care limits | A crack, deep chip, or damaged food-contact glaze |
| Glass bowl | Wash with detergent and non-scratch tools; handle gently | Product-specific even when similar household glass is dishwasher-safe | A chip, crack, or noticeable scratch |
| Plastic bowl | Remove grease and residue from the entire surface, rim, and base | Resin, coating, and rack placement are model-specific | Deep scratches, chewing damage, warping, persistent odor, or residue that will not release |
| Silicone feeding mat | Clean the top, raised edges, folds, and underside; rinse and dry fully | Only if the product says dishwasher-safe; rack placement may be specified | Tears, tacky deterioration, trapped residue, or deformation |
| Rubber feeding mat | Follow the exact hand-wash or machine-care directions and dry both sides | Do not assume rubber is dishwasher-safe | Cracking, powdering, strong persistent odor, or damaged backing |
| Fabric or absorbent mat | Remove food debris, then wash according to its textile care label | Treat as laundry unless the manufacturer says otherwise | Mold-like growth, delamination, damaged backing, or inability to dry completely |
| Slow feeder | Scrub every ridge, channel, corner, and underside feature with a compatible tool | Complex plastic, silicone, ceramic, and metal designs have different limits | Cracks, deep scratches, chewed ridges, or unreachable residue |
| Elevated feeder | Remove and clean bowls; clean the stand, openings, seams, feet, and floor below as allowed | Bowl approval does not prove that the stand is dishwasher-safe or immersible | Swelling, corrosion, loosened hardware, cracks, or inaccessible contamination |
| Automatic feeder or fountain | Separate removable food- or water-contact parts from the powered base, pump, cord, and controls | The manual must identify each dishwasher-safe part and rack position | Liquid in electronics, damaged seals, cracked parts, electrical trouble, or failed reassembly |
Stainless-Steel Pet Bowls
Stainless steel is often simple to maintain, but paint, coatings, rubber rings, double walls, seams, and inserts can change dishwasher compatibility and trap water.
Remove food; wash the interior, exterior, rim, and base with detergent and a non-scratch tool; rinse and dry.
Avoid steel wool, metallic scrapers, and aggressive abrasives unless authorized. Do not assume chlorine is compatible: the bowl instructions and disinfectant label must agree.
Inspect seams, rolled rims, and nonslip bases. If rust returns after approved cleaning, the surface is pitted, a double wall has opened, or a glued base is separating and holding moisture, stop treating it as an ordinary intact bowl. Contact the manufacturer or replace it.
Ceramic Pet Bowls
The cleanable surface of a ceramic bowl is its intact glaze. Wash the surface, rim, foot, and recessed design, and prevent impacts. Glaze, decoration, construction, and an attached base can change dishwasher instructions.
A deep chip or crack can expose underlying material and create a hard-to-clean crevice. Retire the bowl when the manufacturer identifies that damage as a replacement condition; do not repair food-contact cracks with household glue, resin, or paint.
Avoid sudden, severe temperature changes. A very cold ceramic bowl should not be shocked with extremely hot water unless the manufacturer says the item can tolerate that change. This article does not prescribe one washing temperature because both household water systems and product limits vary.
Glass Pet Bowls
Wash glass with detergent and a permitted non-scratch tool. Soak dried food only if allowed, and load dishwasher-safe glass so it cannot strike heavy objects.
Do not use chipped, cracked, or noticeably scratched glass. Avoid hard impacts and sudden temperature changes, including moving a very cold bowl directly into very hot water.
If a glass bowl is part of an elevated stand, remove it carefully and inspect the opening that supports it. Grit trapped between glass and a rigid holder can scratch surfaces or keep the bowl from seating securely.
Plastic Pet Bowls
Plastic bowls vary widely: a model may allow a dishwasher, top rack only, or hand washing. Check the care mark. “BPA-free” does not establish dishwasher compatibility, scratch resistance, or a disinfection method.
Use detergent and a non-scratch tool on grease, dried food, slippery residue, the rim, base, lettering, and nonslip insert. Inspect narrow slow-feeder channels carefully.
Replace a bowl that is deeply scratched, chewed, warped, cracked, permanently tacky, or persistently odorous after approved cleaning. The practical issue is not that every plastic bowl is unsafe. It is that a damaged surface may no longer be reliably cleaned or may have lost its intended shape and stability.
Silicone and Rubber Feeding Mats
Lift the mat and control any puddle before carrying it. Remove crumbs before wet cleaning, then clean raised dots, lettering, edges, and folds.
Some silicone mats are dishwasher-safe; others require wiping or hand washing. Rubber and mixed-material mats may have different heat, detergent, and backing limits. Follow the exact instructions.
Rinse away detergent, then dry both sides. Hang or stand the mat only if doing so will not distort it. Before replacement, touch the underside and inspect the floor. A dry top does not prove that the underside, lip, or floor is dry.
Fabric and Absorbent Feeding Mats
Fabric mats can retain food, saliva, and water inside their fibers. Remove loose food without scattering it, then follow the care label for washing and drying; there is no universal cycle or temperature.
Check foam, rubberized backing, adhesive layers, and trim because their limits may differ from the visible fabric. Remove food before washing and dry the mat completely.
If a mat stays damp, has delaminated, contains material that cannot be reached, or develops visible mold-like growth, stop using it in the feeding station. Do not identify a mold species from its appearance. A damaged absorbent item may be more sensible to replace than to repeatedly wet and reuse.
Slow Feeders Need Geometry-Aware Cleaning
Each slow-feeder ridge, pocket, channel, and underside opening can hold residue. Remove food, use a compatible brush that reaches each channel, and inspect under good light.
Dishwasher approval is model-specific. Nonslip rings, glued parts, coatings, and intricate shapes can add restrictions, and trapped food may remain after a cycle. Inspect after washing.
Replace a slow feeder with a cracked ridge, chewed edge, deep scratches, or residue that remains in an inaccessible cavity. Do not use an aggressive blade or metal pick to rescue a damaged plastic channel.
Elevated Feeders Include More Than the Bowls
Clean removable bowls by their material rules, then check the stand’s openings, underside, feet, fasteners, wall-facing edge, and floor below.
Metal, coated, wooden, plastic, and powered stands do not share one method. Never immerse a wooden or powered stand merely because the bowls lift out; keep excess moisture from seams, hardware, and electronics.
Before resetting, confirm that the stand is stable and dry, the bowls sit correctly, and no moisture remains beneath the feet. Stop if wood or composite material has swollen, hardware is corroded or loose, a coating is peeling into the food area, or a crack prevents thorough cleaning.
Automatic Feeder Removable Food-Contact Parts
The automatic feeder manual controls shutdown and disassembly. Identify owner-removable bowls, trays, hoppers, lids, holders, or conveyors. Dishwasher permissions can differ within one machine, while the powered base must remain dry.
Track assembly order. Do not submerge controls, the motorized base, battery compartment, plug, or cord, or machine-wash an unapproved conveyor, seal, or desiccant compartment.
Rinse and dry washable parts completely, including hopper seams and conveyor paths. Reassemble in order and confirm alignment. If water enters the base or operation is abnormal, stop and contact the manufacturer.
Water Fountain Removable Parts
A fountain may include a basin, tower, housing, tube, pump, impeller, filters, cord, and adapter. “Dishwasher-safe” rarely covers every part.
Unplug and disassemble according to the guide. Discard water, remove filters, and separate the pump before washing approved basin parts. Keep the pump, cord, adapter, and powered base out of the dishwasher unless explicitly approved.
Remove debris from accessible water paths with the recommended tool. A manufacturer’s mineral-deposit or pump method is product-specific, not a universal vinegar rule for bowls, seals, or metals.
Rinse, dry required parts, reinstall the correct filters, and reassemble before refilling. Stop for cracks, cord or pump damage, leakage, electrical odor, unusual heat, or failed reassembly.
Soil and Contamination Classification Table
| Soil or Contamination | First Action | Cleaning or Disinfection Decision | Escalation Boundary |
|---|---|---|---|
| Dry kibble crumbs | Remove crumbs without spreading them under the mat | Clean the soiled item or surface; disinfecting is not the default | Check cracks or feeder cavities if crumbs remain trapped |
| Wet-food residue | Remove leftovers promptly and wash the contact surface | Routine cleaning after use is the primary step | Discard spoiled food; investigate inaccessible residue |
| Saliva or slippery film | Empty, apply detergent, scrub all reachable surfaces, and rinse | Cleaning is usually sufficient for routine care | Do not diagnose organisms from color or texture |
| Standing water or water-film buildup | Empty the bowl or fountain and inspect corners, seams, and parts | Clean and reset with fresh water after rinsing and required drying | Follow fountain instructions if residue is inside a pump or housing |
| Spilled water beneath a mat | Lift the mat, absorb water, and expose the floor | Clean the mat and floor as appropriate; dry both before reset | Follow exact flooring guidance for prolonged moisture or damage |
| Greasy food residue | Remove bulk food, then use detergent and physical cleaning | Routine cleaning; plain rinsing may not remove grease | Stop if residue persists in damaged or inaccessible material |
| Raw pet-food contact | Keep raw residue contained; wash hands, utensils, bowls, and contacted surfaces | Clean first, then disinfect according to authoritative and product-label guidance | Keep this separate from nutrition advice and contact a professional for illness concerns |
| Vomit, feces, or urine near the station | Remove food and clean items from the area; isolate the contamination | Use a separate contamination workflow; disinfection may be justified depending on the event | Use veterinary guidance for illness and deeper cleaning guidance for affected floors or porous materials |
| Visible mold-like or unknown growth | Stop use, discard exposed food, and inspect every affected part | Do not guess the organism or improvise chemistry | Replace damaged porous parts or seek manufacturer or qualified professional guidance |
Cleaning, Sanitizing, and Disinfecting Are Different Jobs
Cleaning uses detergent, water, and physical action to remove soil and germs. Sanitizing and disinfecting use defined processes under specified conditions; the terms are not interchangeable.
Cleaning is usually sufficient for ordinary care. CDC identifies situations in which disinfection may be appropriate, including feces or urine contact, illness, or people and pets at higher risk from germs. Raw pet food adds a food-handling boundary.
When disinfection is justified, remove soil first. Choose a product labeled for the surface and use, then follow its dilution, wet contact time, ventilation, protection, pet-exclusion, rinsing, and drying directions.
One product may require a potable-water rinse; another may allow a specific no-rinse food-contact use. Never transfer directions between products, concentrations, countries, or uses. If the label does not authorize the use, choose another method.
Never combine bleach with vinegar, ammonia, peroxide, disinfectants, or cleaners. Vinegar is not a universal disinfectant, bleach is not universally compatible, and peroxide is not an automatic food-contact solution. Essential oils, fragrance, and “pet-friendly” marketing do not replace exact use directions.
Dishwasher vs Hand Wash
Use the dishwasher only after confirming item approval, rack placement, cycle limits, coatings, rings, removable parts, and drying. If information is missing, hand wash while seeking instructions.
An ordinary cycle can clean approved items but does not automatically disinfect them. CDC distinguishes cleaning from dishwasher disinfection conditions, including a high-temperature or sanitizing setting and heat drying. Both appliance and item instructions must support the method.
Remove food and position items for spray access and drainage. Keep unapproved plastic, feeder bases, pumps, cords, electronics, wooden stands, and nonslip assemblies out of the machine.
For hand washing, remove food, scrub all reachable surfaces with detergent and water, rinse, and dry. Clean and dry the brush too; do not store it wet beside pet food.
If a household includes someone at higher risk from germs, follow current public-health or healthcare guidance appropriate to that person rather than relying only on a general household article.
Feeding-Mat Underside and Floor Interface
A feeding mat contains mess but does not prove the floor is protected. Water and food can cross an edge or become trapped beneath a flexible sheet.
Lift the entire mat; inspect its top, underside, border, and floor. Remove crumbs, absorb spills, and clean only the immediate floor with a compatible method.
Wood needs prompt spill removal and controlled moisture. Laminate limits vary. Some vinyl manufacturers warn that rubber- or latex-backed mats can discolor flooring, while grout can retain residue. If the floor is unknown, use minimal moisture and find its care guidance.
Dry the floor and mat separately. Do not return a damp mat to wood, laminate, LVP, grout, or another surface simply because the top looks presentable. If a mat repeatedly traps water, reconsider its size, edge design, placement, and inspection routine.
Small-Apartment Drying and Food-Safe Reset
Clear a drying zone before washing: a clean rack, tray, or towel in a ventilated place away from raw food, dirty tools, chemicals, trash, and pets. Every washed component must be completely dry before reset when its instructions require full drying.
Separate wet bowls for airflow, stand slow feeders so channels drain, orient hollow components to release moisture, and keep electronic bases dry.
Use the third locked decision table as the reset check:
| Feeding-Zone Component | Main Contamination Trap | Dry Before Reset? | Apartment Reset Rule |
|---|---|---|---|
| Food bowl | Rim, base, oily residue, nonslip ring | Yes | Return only after rinse and drying; do not place beside chemicals |
| Water bowl | Slippery film, standing water, seam or base | Yes | Refill with fresh water after the bowl is clean and ready |
| Slow feeder | Ridges, channels, corners, underside cavities | Yes | Inspect under good light before adding food |
| Silicone or rubber mat | Raised edge, folds, texture, underside | Yes, both sides | Replace only on a dry, compatible floor |
| Fabric mat | Fibers, backing, seams, retained moisture | Yes, completely | Do not return while the interior or backing is damp |
| Elevated stand | Bowl openings, feet, hardware, floor below | Yes where wet-cleaned | Reassemble stable, dry, and free of trapped residue |
| Automatic feeder parts | Hopper seams, tray channels, conveyor or holder | As the manual requires | Keep the base dry; reassemble in the specified order |
| Fountain parts | Basin corners, housing, tube, pump components | As the manual requires | Keep pump and powered parts within exact care limits |
After drying, wash your hands, inspect and reassemble the station, refill, and secure chemicals. A food-safe reset has no visible soil, detergent, unapproved disinfectant residue, trapped moisture, or nearby chemical container.
One-Bowl-Set vs Backup-Bowl Workflow
With one set of bowls, clean at a time that allows the items to finish their required drying before the next use. Remove food, wash, rinse, dry, inspect, and reset. Do not shorten drying by stacking a damp bowl, placing it on a wet mat, or using unapproved heat.
If the household regularly reaches the next meal before a bowl is ready, a compatible backup set can reduce pressure. Rotate the dirty bowl into washing and place a clean, dry bowl into service. The backup is an operational convenience, not a reason to delay cleaning or a rule that every household must buy duplicates.
For an automatic feeder, a spare removable bowl or tray may help only if it is the correct manufacturer-compatible part. A similar-looking tray can interfere with sealing, alignment, or dispensing.
Multi-Pet Bowl Identification
In a multi-pet apartment, identify bowls without making medical or behavior assumptions. Use a consistent location, color, shape, or removable label that does not damage the food-contact surface. Keep the identification visible after washing.
Do not scratch a name into a bowl or apply an unapproved sticker, paint, or marker where food, water, tongues, or dishwasher heat can contact it. If one pet is sick or has veterinarian-directed cleaning requirements, follow that professional plan and keep the relevant items separated as instructed.
Separate identification also helps you notice practical problems: one water bowl developing film faster, one slow feeder retaining food, or one mat receiving most spills. It does not diagnose why a pet eats or drinks differently.
Raw Pet-Food Boundary
Raw pet food is a food-safety exception, not a nutrition section. FDA guidance states that raw pet food can carry harmful bacteria and recommends thorough cleaning and disinfection of surfaces and objects that contact it. That includes feeding bowls, utensils, and preparation surfaces.
Keep raw residue contained. Wash hands before and after handling pet food. Clean bowls and utensils with soap and water after use, then follow authoritative and product-label directions for the justified disinfection step. Prevent raw food, its packaging, and used utensils from contacting clean dishes, drying bowls, mats, counters, or handles.
Do not use this cleaning workflow to endorse or condemn a feeding plan, calculate portions, or advise on nutrition. Questions about diet suitability belong with a veterinarian or qualified veterinary nutrition professional. Illness after possible food exposure also belongs with a healthcare or veterinary professional, not a stronger homemade cleaner.
Vomit, Feces, or Urine Near the Feeding Zone
If vomit, feces, or urine contaminates the feeding area, remove the pet’s food, clean dishes, and accessible water from the zone. Keep pets and people from tracking the material. Treat the event as a separate contamination workflow rather than continuing ordinary bowl washing beside it.
Remove the contaminant safely, clean affected compatible surfaces, and disinfect when the contamination type, illness context, authoritative guidance, and product label justify it. Follow the label for contact time, rinsing, drying, ventilation, and re-entry. Do not mix products or use a bowl-cleaning brush on the contaminated floor.
If urine has reached carpet, flooring seams, padding, or another deeper material, use a contamination-specific guide rather than repeatedly wetting the surface. If the larger problem is a recurring apartment odor whose source is not clear, the pet odor source guide provides the broader diagnostic boundary.
New, repeated, or illness-associated vomiting, diarrhea, urination, appetite change, or drinking change is not a cleaning diagnosis. Contact a veterinarian.
Replacement and Stop Conditions
Replace or stop using an item when damage prevents reliable cleaning, creates a physical hazard, or conflicts with the manufacturer’s limits. Important signals include:
- deep scratches, cracks, chips, sharp edges, or chewing damage on a food-contact surface
- ceramic glaze damage or glass that is chipped, cracked, or noticeably scratched
- plastic that is warped, permanently tacky, strongly odorous after cleaning, or holding residue in damaged areas
- persistent stainless-steel pitting, returning rust, failed seams, or a separating nonslip base
- a mat that is torn, delaminated, powdering, trapping moisture, or showing mold-like growth
- an elevated stand that is swollen, unstable, corroded, or impossible to clean around damaged joints
- a feeder component that no longer seals, aligns, turns, or seats as designed
- liquid inside an electronic base, damaged wiring, a cracked pump, electrical odor, unusual heat, sparking, or repeated malfunction
Do not repair a food-contact crack with household adhesive and assume it is safe. Do not continue running a wet or abnormal powered feeder or fountain to see whether it improves. Contact the manufacturer or a qualified service provider where appropriate.
Common Pet-Bowl Cleaning Mistakes
- Cleaning only the inside of the bowl. The rim, exterior, base, seam, and nonslip ring can also hold food and moisture.
- Wiping away crumbs and calling the bowl clean. Dry removal is useful, but it does not remove oily or saliva residue.
- Using the same rule for every material. Coatings, decorations, backing, adhesives, and component construction change care limits.
- Assuming stainless steel, ceramic, glass, plastic, silicone, or rubber is automatically dishwasher-safe. Exact product instructions control.
- Calling every dishwasher cycle disinfection. Cleaning and disinfection require different verified conditions.
- Disinfecting every item by default. Routine cleaning is usually the starting point; disinfection needs a reason.
- Using universal vinegar or bleach advice. Effectiveness, material compatibility, food-contact use, and rinse rules vary.
- Mixing cleaners. Never combine bleach, vinegar, ammonia, peroxide, disinfectants, or other cleaners.
- Trusting “pet-safe” marketing without reading the label. The intended surface, use, dilution, contact time, rinse, and access directions still matter.
- Leaving detergent or disinfectant residue. Rinse food-contact items whenever the exact directions require it.
- Cleaning only the top of the mat. Water and food can remain underneath and affect the floor.
- Resetting while damp. Moisture can remain in fabric backing, slow-feeder channels, silicone folds, hopper seams, or beneath a stand.
- Putting a pump or electronic feeder base in the dishwasher. Removable food-contact parts and powered components have separate rules.
- Using the bowl brush on biological floor contamination. Keep ordinary food-contact cleaning tools out of urine, feces, and vomit workflows.
- Turning cleaning guidance into medical diagnosis. Film, odor, stains, eating changes, or skin changes do not identify an infection, allergy, acne, or gastrointestinal disease.
For cadence, place these execution steps inside a realistic routine rather than expanding this article into a schedule. The weekly apartment cleaning schedule for pet homes covers when broader tasks fit together.
Final Takeaway
The safest way to clean pet bowls is to make the decision in order. Identify the item and material. Classify the soil. Clean with a compatible method. Add disinfection only when the situation justifies it. Follow the exact product label for food-contact rinsing, drying, ventilation, and pet access.
Treat the feeding mat and floor below it as one immediate interface. Lift the mat, remove residue, clean both surfaces appropriately, and let both dry before reset. Separate removable feeder or fountain parts from pumps, cords, controls, and electronic bases. Replace damaged items that can no longer be cleaned reliably.
In an apartment, plan the drying space before washing, use a backup bowl only when it genuinely solves timing pressure, identify multi-pet bowls without altering food-contact surfaces, and keep chemicals away from the feeding station. The goal is a clean, dry, correctly reassembled zone—not the strongest product or the most complicated routine.
Sources
- CDC: About Cleaning and Disinfecting Pet Supplies
- CDC: Cleaning and Disinfecting With Bleach
- FDA: Tips for Safe Handling of Pet Food and Treats
- FDA: Get the Facts About Raw Pet Food Diets
- EPA: Read the Label First—Protect Your Pets
- EPA: Food-Contact Surface Rinse Guidance
- Basis Products: Pet Food and Water Bowl Use and Care
- Petware Pottery: Ceramic Pet Bowl Care
- Anchor Hocking: Glass Care and Use
- PetSafe: Healthy Pet Simply Feed Care and Cleaning
- PetSafe: Drinkwell Stainless Multi-Pet Fountain Cleaning
- PetSafe: Fountain and Feeder Mat Care
- Gorilla Grip: Pet Feeding Mat Care Instructions
- PETLIBRO: Cove Pet Placemat Care
- National Wood Flooring Association: Wood Floor Maintenance
- Pergo: Laminate Maintenance
- Shaw Floors: Luxury Vinyl Care