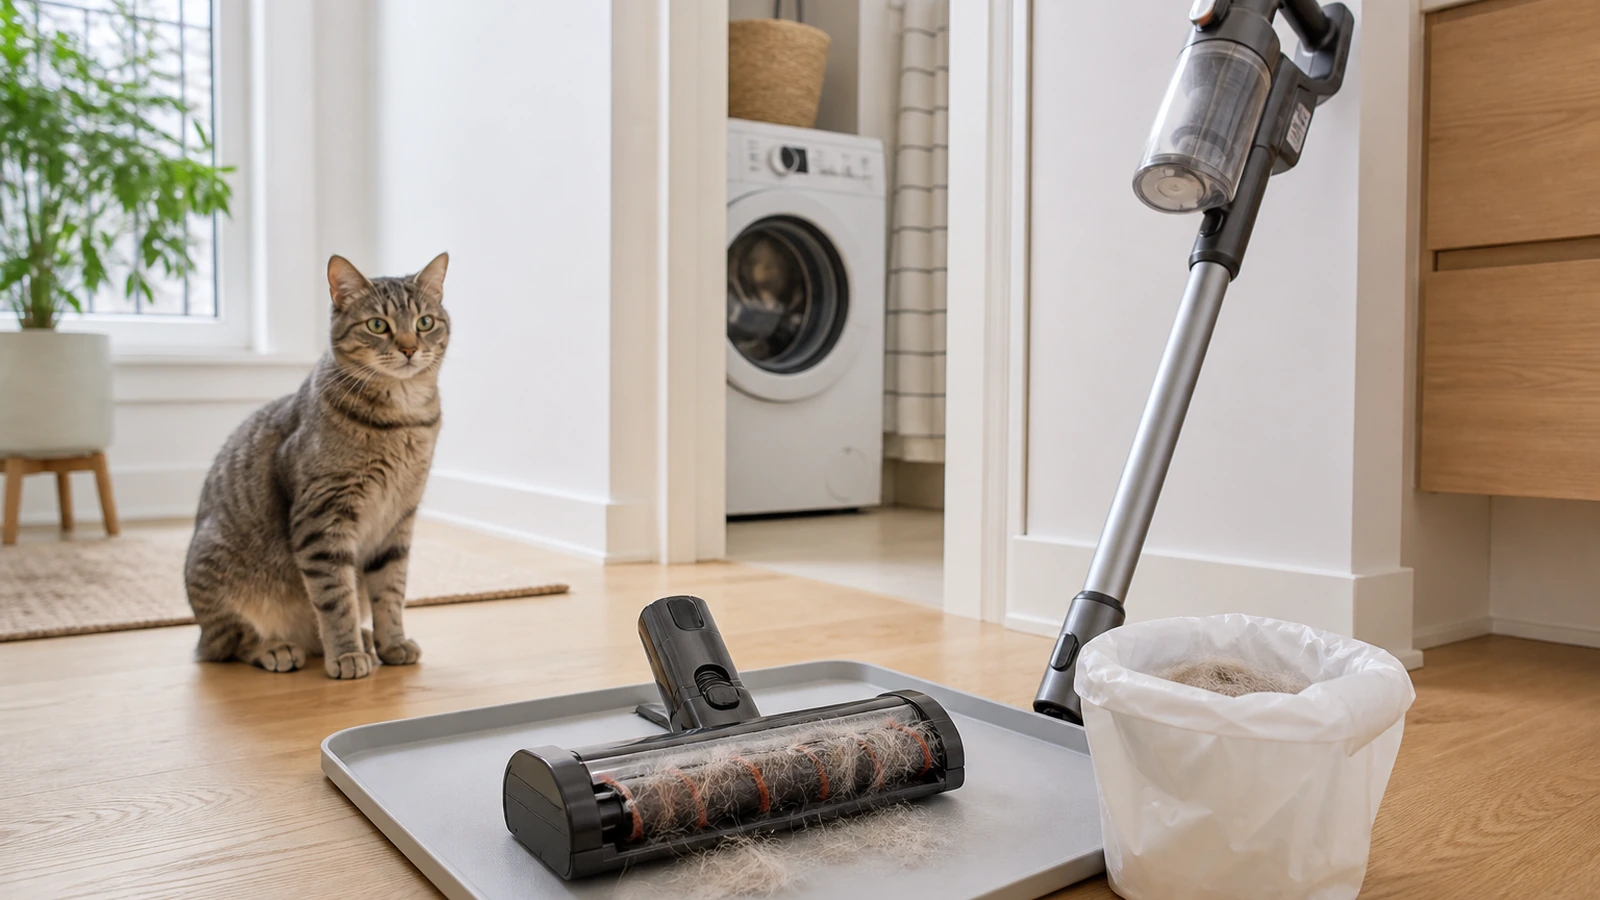
Learning how to clean pet hair out of a vacuum is less about one dramatic deep clean and more about checking the machine in the right order. Pet hair can wrap around a floor brush, pack behind an end cap, bridge across a small bin, clog a mini upholstery tool, or combine with dust in a filter. Those problems may look similar from the outside, but they do not have the same solution.
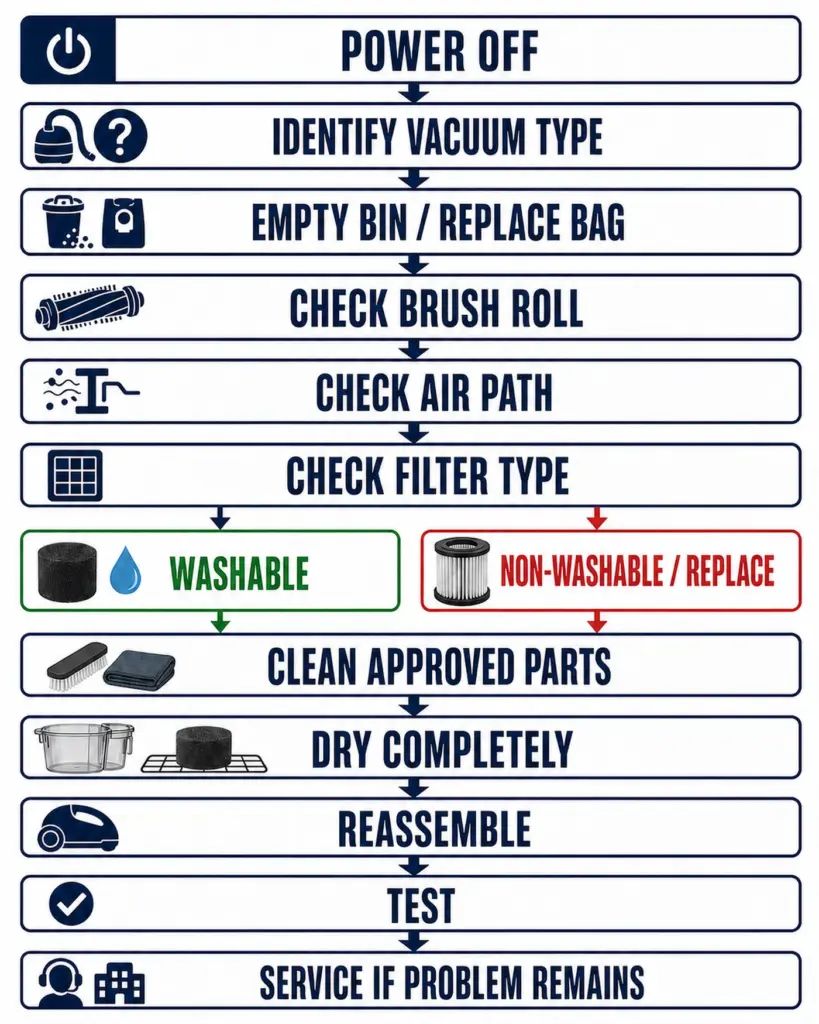
Start with the exact manual. Disconnect power as directed, identify the bag or bin system, and inspect only owner-accessible parts. Clear dry debris first. Wash only explicitly washable components, dry them completely as instructed, reassemble, and test in a clear area.
Use this sequence:
POWER OFF / DISCONNECT → IDENTIFY VACUUM TYPE → EMPTY BAG OR BIN → INSPECT BRUSH ROLL / PET TOOL → CHECK AIR PATH → CHECK FILTER → CLEAN ONLY APPROVED PARTS → DRY COMPLETELY → REASSEMBLE → TEST → REPLACE OR SERVICE IF NEEDED
Quick Answer
Switch off and unplug where applicable. For a cordless model, follow its battery-isolation instructions; not every battery is removable. Empty the bin or replace the bag, then inspect the brush roll, ends, powered pet tool, hose, wand, inlet, and filter path.
Remove wrapped hair only by the method allowed for that model. Some brush rolls slide out, some require a specific cover-removal procedure, and some floorheads should not be opened by the owner. Do not make “cut it with scissors while installed” your universal method. A manufacturer-provided hair-removal groove or tool may be appropriate for one design but not another.
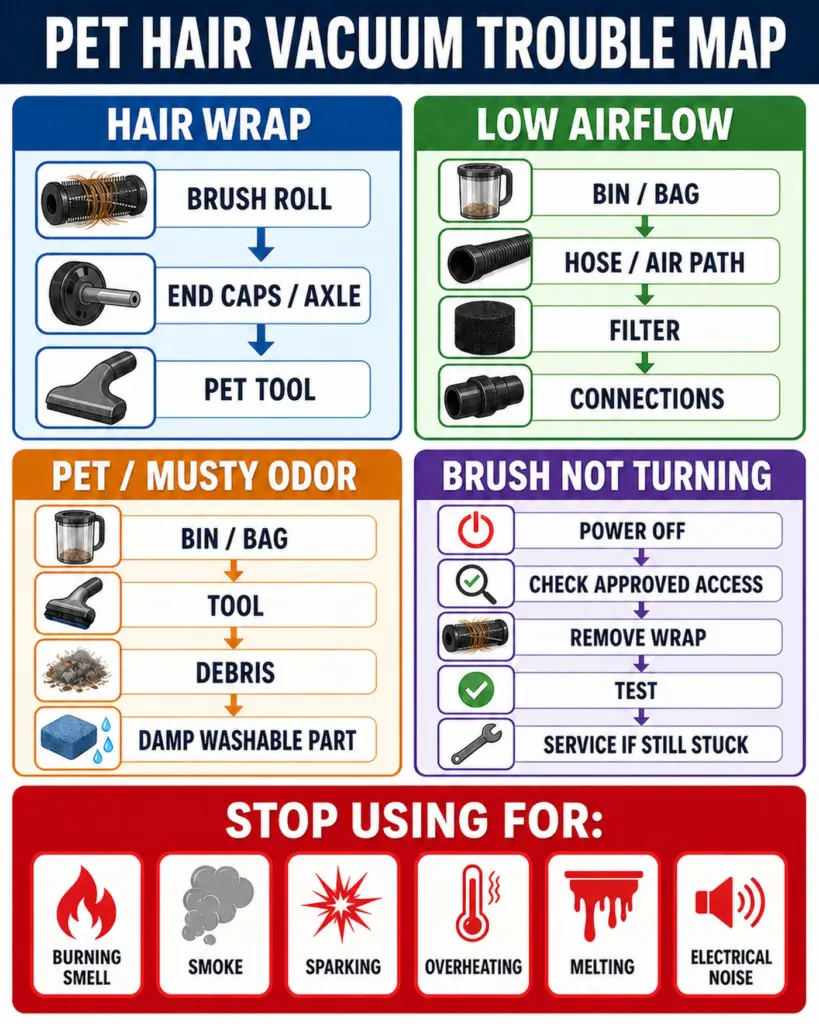
Stop using the vacuum if you notice a burning or acrid smell, smoke, sparking, melting, repeated overheating, damaged electrical parts, or unusual electrical noise. Routine pet-hair maintenance is not electrical repair.
Table of Contents
Start by Powering Down the Vacuum
The first maintenance step happens before you touch the brush, bin, hose, or filter. Put the vacuum on a stable surface, switch it off, and prevent accidental startup.
For a corded upright, stick, or canister vacuum, unplug before clearing a moving part or opening a maintenance area. Keep the plug visible, and stop if the cord, plug, or housing appears damaged.
For a cordless vacuum, turn it off and consult the exact manual. Some batteries are designed to be removed by the owner; others stay in the machine. Some attachments can be detached from the powered body to isolate the working area. Follow the model-specific sequence instead of forcing a battery latch or assuming that pressing the power button is the only safeguard.
For a robot vacuum, pause and shut it down as instructed, removing it from the dock when directed. Do not work on a brush while the robot can start a cleaning cycle, and keep pets away from exposed parts and maintenance tools.
Identify the Vacuum Type Before Cleaning It
You do not need eight separate maintenance routines, but you do need to know which architecture is in front of you. Architecture changes where hair collects, how power is isolated, and which parts are owner-accessible.
| Vacuum Architecture | Main Maintenance Priority | Common Pet-Hair Issue |
|---|---|---|
| Bagless upright | Bin, cyclone or shroud, floorhead, hose, prefilter | Hair bridges in the bin or wraps around the full-width brush roll |
| Bagged upright | Bag fill, bag seating, filters, powered brush | Overfilled bag or hair around the brush ends reduces airflow or rotation |
| Cordless stick | Battery-safe shutdown, small bin, floorhead, filters | Small airflow path loads quickly; hair reaches roller ends and tool joints |
| Corded stick | Unplugging, compact bin or bag, fixed or removable floorhead | Hair packs into a narrow nozzle or non-removable brush area |
| Canister | Bag or bin, hose, wand, floor tool, exhaust filter | Hair or debris restricts a long hose or powered floorhead |
| Handheld | Small bin, filter screen, compact pet tool | Hair bridges across the bin or blocks a mini brush and filter screen |
| Robot vacuum | Main brush, end caps, axles, side brush, bin, robot filter | Hair wraps behind end caps and around side-brush hubs |
| Motorized mini pet tool | Roller, end areas, airway, electrical contacts | Upholstery hair compacts around a small roller or turbine path |
Find the model number and use it to locate the current official manual. A product name may describe a family rather than the exact maintenance design.
Step 1: Empty the Bag or Bin
The collection stage is the first airflow checkpoint because it is easy to inspect without opening the motor housing. It also prevents loose debris from moving back toward the brush or hose while you work.
Bagless Vacuums
Move a lined trash can or bag close. Hold the bin low inside the waste opening when the design allows, use its release correctly, and close the bag promptly.
Look for hair bridging: a mat can span the bin and make it appear less full than it is. Do not push fingers or a sharp object into a narrow cyclone opening. Release accessible dry debris only by the approved method.
Inspect the bin door, gasket, and connections for trapped strands. Clean only as the exact instructions allow: some bins can be rinsed, others only wiped, while cyclone assemblies may need to remain dry.
Bagged Vacuums
Switch off and unplug the vacuum before opening the bag compartment. Check the fill indicator and the bag itself according to the manual. Replace a full or airflow-restricting disposable bag; do not empty it for reuse and do not wash it.
Keep the bag opening controlled, insert the correct replacement fully, and confirm that it is seated before closing the compartment. Do not force a lid that will not close.
Inspect the accessible compartment for loose hair or a mis-seated or damaged bag. Miele’s FilterBag troubleshooting guidance treats bag fill, blocked airways, motor-protection filters, and exhaust filters as separate checkpoints. Never wash a disposable bag.
Step 2: Remove Pet Hair From the Brush Roll
Hair around the visible middle of the brush is only one failure mode. Check the roller surface, any manufacturer-provided groove, both ends, accessible end caps, the axle area, and the surrounding nozzle path.
Removable Brush Roll
If the manual identifies the brush roll as owner-removable, follow its exact release sequence. That may involve a coin slot, latch, end cover, bottom plate, or screws. Keep removed fasteners in a small tray so they do not disappear under furniture.
Once the roller is out, support it on a washable mat and use the supplied tool or approved method. A hair-removal groove may provide clearance for an approved cutting tool, but it does not make every blade or angle safe. Keep any permitted blade away from fingers, bristles, belts, seals, and soft roller material.
BISSELL’s CleanView brush-roll instructions use a defined cover, screws, removable roller, spin check, and end-cap alignment. That procedure is not a template for every vacuum head.
Non-Removable Brush Roll
If the manual does not permit roller removal, leave it installed. Disconnect power, position the floorhead stably, and use only the approved access method. Do not remove screws merely because they are visible. Some screws secure a service-only assembly, belt system, wiring route, or sealed housing.
BISSELL support for another stick-vacuum family specifically warns that attempting to remove the brush cover can destroy the foot and void the warranty. The contrast between official BISSELL procedures proves the core rule: model identity controls disassembly.
Do not slide scissors blindly beneath tight hair. If the manual permits cutting and provides a safe groove, work in short sections; otherwise use the supplied tool or contact support.
Brush-Roll Ends and Axle Areas
Hair can migrate past the main bristle area and wind tightly behind an end cap or around an axle. This may add drag even after the visible center looks clean. Inspect both ends under good light. Remove an end cap only if the manual makes it owner-accessible, and note its orientation before removal.
iRobot’s main-brush care guidance tells owners to clear hair from brush bearings, caps, and axles for applicable Roomba models. Robot instructions differ by series, but the overlooked lesson applies broadly: the ends can matter as much as the middle.
Do not add household lubricant or WD-40. If an approved clean roller still binds, feels rough, has a damaged cap, or will not turn freely, replace the specified part or seek service.
Motorized Pet Tool
A mini motorized upholstery tool may collect tightly packed hair at its roller ends and narrow intake. Disconnect it as directed and inspect only accessible areas. Do not soak it or spray cleaner into it. A stalled tool after approved cleaning needs manufacturer troubleshooting, not deeper improvised disassembly.
Anti-Tangle and Self-Cleaning Brushes
Anti-tangle or self-cleaning designs can reduce visible wrap, but hair can still collect at end caps, axles, side channels, a soft roller, or behind the floorhead. Current manufacturer guidance still instructs owners to clean accessible brushroll and soft-roller areas and check for blockages.
Step 3: Check the Air Path
Pet hair rarely forms a neat plug by itself. It can combine with thread, dust, paper, crumbs, litter, or soft debris and lodge at a bend or narrow connection. Follow the airflow path without opening the motor housing.
Begin at the inlet behind the brush or tool. Check removable tool connections, the wand, accessible hose sections, elbows, and the opening into the bin or bag compartment. Detach each part only as the manual allows. Use light to look through a straight tube where practical.
Do not use a sharp object inside a hose. It can puncture the wall, damage wiring in a powered hose, or push the obstruction deeper. Do not spray cleaner into the airway, and do not use compressed air unless the manufacturer specifically permits it. Compressed debris can enter an inaccessible component or blow dust across the apartment.
Reattach every connection fully. A hose, wand, bin, or tool that is only partly seated can create an air leak that resembles a clog.
Step 4: Check the Filter Type
“The filter” may refer to several different components. Identify its name, location, material, and maintenance instruction before tapping, brushing, washing, or replacing it.
| Component | Can It Be Cleaned? | Can It Be Washed? | Drying or Replacement Boundary |
|---|---|---|---|
| Washable prefilter | Usually, by the exact approved method | Only when the manual says washable | Dry completely for the stated conditions before reinstalling |
| Washable foam filter | Often removable and washable on specified models | Model-specific | Internal foam must be fully dry, not just surface-dry |
| Non-washable media or HEPA filter | May allow tapping or dry debris removal | No, unless the exact manual explicitly says otherwise | Replace at the specified condition or interval |
| Exhaust filter | Maintenance varies by material and model | Model-specific; many are replace-only | Use the specified replacement type and indicator or interval |
| Robot filter | Often tap-clean or replace | Frequently non-washable, but exact series controls | Keep away from liquid and replace as directed |
| Handheld filter | May include screen, cloth, foam, or pleated media | Model-specific | Reassemble only when every washable layer is completely dry |
| Disposable vacuum bag | Replace when directed | No | Seat a compatible new bag correctly; do not reuse a full bag |
| Bin or dust cup | Empty and clean as directed | Model-specific | Inspect door and seals; dry completely if washing is permitted |
| Cyclone or shroud | Dry debris removal may be allowed | Often restricted; exact model controls | Keep dry where instructed and do not spray into fine passages |
| Powered brush head | Accessible dry hair removal | Do not assume washability | Keep motor, contacts, bearings, and belt areas within manual limits |
Washable Prefilters and Foam Filters
Remove loose debris as instructed before washing. Use only permitted water temperature and products; do not add bleach, vinegar, fragrance, essential oil, or strong detergent.
Drying times vary. Shark gives 24 hours for specified filters, while BISSELL’s Pet Hair Eraser handheld support gives 24 to 48 hours for that family. Do not convert those examples into a universal schedule. Without a verified number, dry completely according to manufacturer instructions.
Non-Washable Media, HEPA, Exhaust, and Robot Filters
Keep a non-washable filter away from water. Use only the permitted dry method, which may be gentle tapping or replacement. Do not scrub pleats or use compressed air unless explicitly allowed.
iRobot’s Roomba 800 and 900 filter instructions say the filter is not washable. BLACK+DECKER’s handheld-filter guidance tells owners to confirm washability in the manual. Identify the exact filter first.
The Bag as a Filtration Stage
In a bagged vacuum, a full bag or one loaded with fine dust can restrict airflow before it looks packed. Replace it according to its indicator and instructions, then treat motor-protection and exhaust filters as separate components.
Step 5: Clean Only Approved Parts
After dry hair and debris are removed, decide whether any remaining part is explicitly washable. Permission must come from the exact manual, not from the part’s plastic appearance.
Never rinse a motor housing, battery, charger, plug, powered hose, electrical connection, or powered brush assembly. Do not soak a floorhead. Do not spray water or cleaner into an inlet, hose, cyclone passage, or filter cavity. Do not put parts in a dishwasher unless the manufacturer specifically says they are dishwasher-safe.
Avoid odor-masking additions. Fragrance or essential oil on a filter can introduce flammable or incompatible substances, while deodorizing powder can load filters or reach the motor path. Bleach and vinegar are not vacuum-maintenance shortcuts.
Use a dry or slightly damp cloth only where allowed. If a bin, roller, or non-powered attachment is washable, remove large hair clumps into household waste first and follow the manufacturer’s directions.
Step 6: Dry Completely Before Reassembly
A part can feel dry outside while moisture remains inside foam, pleats, seams, end caps, or a gasket. Reinstalling it early can cause damp odor, load dust into wet media, or restrict airflow.
Place washable components in a stable, ventilated area away from pets, food preparation, and direct heat unless the manual permits a specific drying method. Do not use an oven, microwave, clothes dryer, hair dryer, radiator, or intense heat to speed the process unless the exact instructions authorize it.
In an apartment, use a clean drying tray or rack in a bathroom or laundry area. Keep wet parts out of a closed closet and away from the charging station. Plan maintenance for a time when the vacuum will not be needed immediately.
Before reassembly, inspect the filter internally as far as its design allows, check bin seals and gaskets, confirm roller end caps are oriented correctly, and make sure every connection is free of trapped hair. Then follow this reset:
CLEAN → DRY COMPLETELY → INSPECT → REASSEMBLE → TEST
What Changes With Bagged vs Bagless Vacuums
Bagless maintenance exposes the owner more directly to debris. Hair can bridge around a shroud, while seals and multiple filters need separate checks. Empty low into a lined bag and clean escaped hair afterward.
Bagged maintenance still requires monitoring fill, seating the replacement, inspecting the compartment, and maintaining separate filters. Never wash a disposable bag or assume it must be packed solid before replacement.
Neither architecture is universally cleaner or better. This is a maintenance distinction, not a buying comparison.
What Changes With Cordless Vacuums
Keep the machine away from the charger during wet-part cleaning. Remove the battery only if the manual requires or permits it. Inspect charging contacts without wetting or scraping them. Allow washable components to dry in a separate ventilated location, not while attached to the vacuum in a closet.
Store and charge on the approved mount or a stable surface. Keep the cable out of pet walkways and chewing reach. Battery swelling, unusual heat, odor, leakage, or charger damage is a stop-and-support issue.
What Changes With Robot Vacuums
A robot adds main and side brushes, wheel wells, sensors, a small bin, and a compact filter. Hair can wind behind an end cap or side-brush hub even when the roller center looks clear.
Follow the series-specific brush-removal instructions. Keep small screws, caps, and bearings organized. Clear accessible hair without forcing a wheel or opening the robot body. Wipe sensors and charging contacts only as instructed. Robot filters are commonly non-washable, but verify the exact series rather than assuming.
Empty the robot bin in a contained area and inspect the path into the bin. If a self-empty dock is present, its bag, intake path, and maintenance instructions add another layer. Do not spray cleaner into the dock or robot airway.
After reassembly, test on a clear floor. A returning brush error, damaged wheel, electrical smell, charging fault, or repeated overheating belongs with manufacturer support.
Why Your Vacuum Smells Like Pet Hair
A stale or pet-like odor can come from ordinary debris left in the bin, a full bag, hair packed in an upholstery tool, debris in a hose, a loaded prefilter, or a compatible filter that needs cleaning or replacement. Damp pet hair or a washable component reinstalled before it dried can create a musty smell.
Check dry, accessible sources in order: bin or bag, tool, hose or airway, prefilter, and other filters. Clean or replace each only as directed. Do not cover the smell with essential oils, fragrance drops, scented powders, or cleaner sprayed into the machine.
Separate musty or debris odor from electrical danger. A burning or acrid smell, smoke, sparking, melting, repeated overheating, or unusual electrical noise is not “pet odor.” Switch off, disconnect the vacuum if it is safe to do so, keep it away from pets and combustible materials, and contact the manufacturer or qualified service provider. Do not run it again to see whether the smell clears.
What to Check When Suction Drops
Reduced pickup may reflect a full collection stage, restriction, loaded filter, air leak, incorrectly fitted part, damaged tool, or surface setting. Stop at the owner-maintenance boundary.
BIN / BAG → AIR PATH → HOSE → TOOL → FILTER → SEALS / CONNECTIONS → MANUFACTURER TROUBLESHOOTING
| Symptom | First Maintenance Checkpoint | Stop or Service Condition |
|---|---|---|
| Hair remains on the floor | Brush surface, end caps, inlet, correct floor setting | Roller damage, persistent stall, or problem continues after approved checks |
| Weak airflow | Bin or bag, then accessible airway and hose | No improvement after approved cleaning or internal blockage is inaccessible |
| Brush does not turn | Power off; inspect approved brush and end areas | Burning smell, damaged belt or wiring, repeated error, or inaccessible mechanism |
| Vacuum pulses or shuts off | Follow model-specific blockage and filter checks | Repeated overheating, battery fault, electrical odor, or damaged power parts |
| Pet or musty odor | Dry debris sources and damp washable components | Burning or acrid odor, smoke, sparking, melting, or electrical noise |
| Dust escapes | Bag or bin seating, filter installation, door and seals | Cracked housing, damaged seal, torn bag path, or unresolved leakage |
| Robot reports brush error | Main brush, end caps, axle, side brush, and bin | Error returns, drive component is damaged, or robot requires opening beyond manual |
| Mini pet tool stalls | Disconnect; inspect roller ends and accessible airway | Motor, turbine, belt, or housing needs unapproved disassembly |
Do not promise that cleaning will restore original suction. If the vacuum remains weak after correct owner maintenance, use the manufacturer’s troubleshooting path. Worn seals, damaged hoses, failing motors, sensors, batteries, belts, or internal components may require replacement or service.
What to Check When the Brush Stops Turning
First distinguish intentional shutoff from a fault. Some machines stop the brush when upright, on a certain setting, during protective shutdown, or when the tool is not seated. Read the indicators before resetting anything.
Power down and inspect visible wrap, both ends of the roller, accessible caps, the inlet, and the tool connection. Confirm that reassembled parts are seated and locked. If the manual provides a brush reset, use that procedure only after the obstruction is cleared.
Do not keep restarting a jammed brush. Repeated attempts can add heat or damage a belt, roller, or drive component. If the roller still binds, the error returns, or the approved maintenance area is clear, stop and contact support.
Apartment Vacuum Maintenance Setup
Choose a washable, well-lit, ventilated maintenance zone. A bathroom or laundry area may work better than a kitchen, bedroom, or space beside pet bowls. Keep a lined trash container, paper for catching hair, the approved tool, and a small parts tray nearby.
With a small trash can, place the bin low inside a larger waste bag before opening it. Do not shake filters from a window or balcony; use the approved indoor method and contain debris.
Collect brush-roll hair directly onto paper or into a bag rather than dropping it onto the floor. Finish by cleaning the floor around the maintenance zone. If whole-apartment hair movement is the larger problem, the pet-hair control guide handles floors, furniture, laundry, and source control without expanding this machine-maintenance task.
Dry washable parts on a tray or rack with airflow. Store replacement bags and filters dry, in packaging, away from pet food and splashes. Keep clean attachments together rather than loose in a closet.
Save powered tests and noisy robot-dock cycles for an appropriate hour if sound carries easily between apartments.
If the machine is wrong for the apartment rather than merely due for maintenance, use the small-apartment pet-hair vacuum guide for the buying decision.
Common Pet-Hair Vacuum Maintenance Mistakes
- Opening the floorhead before finding the manual. Visible screws do not prove that owner disassembly is allowed.
- Cutting hair blindly while the roller is installed. A blade can damage bristles, soft roller material, a belt, wiring, or fingers.
- Cleaning only the center of the brush. Hair behind end caps or around axles can remain after the visible wrap is gone.
- Washing every filter. Filter material and washability vary by exact model and filter stage.
- Using one universal 24-hour drying rule. Verified drying instructions range by product; the exact manual controls.
- Reinstalling a filter that feels dry outside. Moisture can remain inside foam or pleats.
- Washing a disposable vacuum bag. Replace it as directed and inspect the associated filters separately.
- Soaking a powered pet tool. A compact attachment may contain a motor, turbine, belt, bearings, or electrical contacts.
- Spraying fragrance or cleaner into the vacuum. Odor masking can contaminate filters and powered airways without removing the source.
- Adding household lubricant. An unapproved oil or spray can attract dust, reach belts or electrical parts, and conflict with materials.
- Testing repeatedly through overheating or unusual smell. Electrical danger and protective shutdowns require a stop, not persistence.
- Forgetting the maintenance floor. Hair cut from the roller can travel back into the room on socks, paws, or tools.
When to Replace a Part or Call for Service
Replace a bag or filter when directed and replace worn brushes, damaged caps, cracked hoses, failed seals, or parts that fail inspection. Use the exact compatible part number; a similar-looking filter, roller, battery, or charger may not fit safely.
Contact manufacturer support when the correct maintenance sequence does not resolve weak airflow, a brush error returns, a roller will not turn freely, an internal blockage cannot be reached through approved access, or the manual does not identify the part as owner-serviceable.
Stop immediately for burning or acrid odor, smoke, sparking, melting, repeated overheating, damaged cords or plugs, battery swelling or leakage, unusual electrical noise, or visible damage near powered components. Do not open a motor housing, battery pack, charger, wired hose, or sealed powered head. Do not attempt electrical repair from a generic tutorial.
Final Takeaway
Treat the vacuum as distinct checkpoints. Disconnect power, identify its architecture, empty the bag or bin, clear approved brush and tool areas, check the air path, identify each filter, and wash only explicitly washable components.
Let washed parts dry completely, inspect seals and connections, reassemble in the correct order, and perform a short test in a clear area. If odor, low airflow, or a stopped brush remains after approved maintenance, move to manufacturer troubleshooting or service. Electrical smell, smoke, sparking, melting, overheating, and unusual electrical noise are immediate stop signals.
In an apartment, keep hair contained, use a washable work zone, protect pet food, dry parts with ventilation rather than closed storage, reset attachments, and clean the floor. That completes the maintenance loop without turning it into unsafe DIY repair.
Sources
- Dyson: Brush Bar Not Spinning
- Dyson: Vacuum Troubleshooting and Component-Cleaning Boundaries
- Shark: Upright Vacuums Maintenance and Most Common Inquiries
- BISSELL: CleanView Bagless Brush Roll Maintenance
- BISSELL: Pet Hair Eraser Cordless Hand Vacuum No or Low Suction
- Miele: Cleaning Performance Reduced With FilterBag
- SEBO: Vacuum Maintenance How-To Videos
- iRobot: Main Brush Care for Roomba Models
- iRobot: Roomba 800 and 900 Filter Care
- BLACK+DECKER: Hand Vacuum Filter Washing Guidance