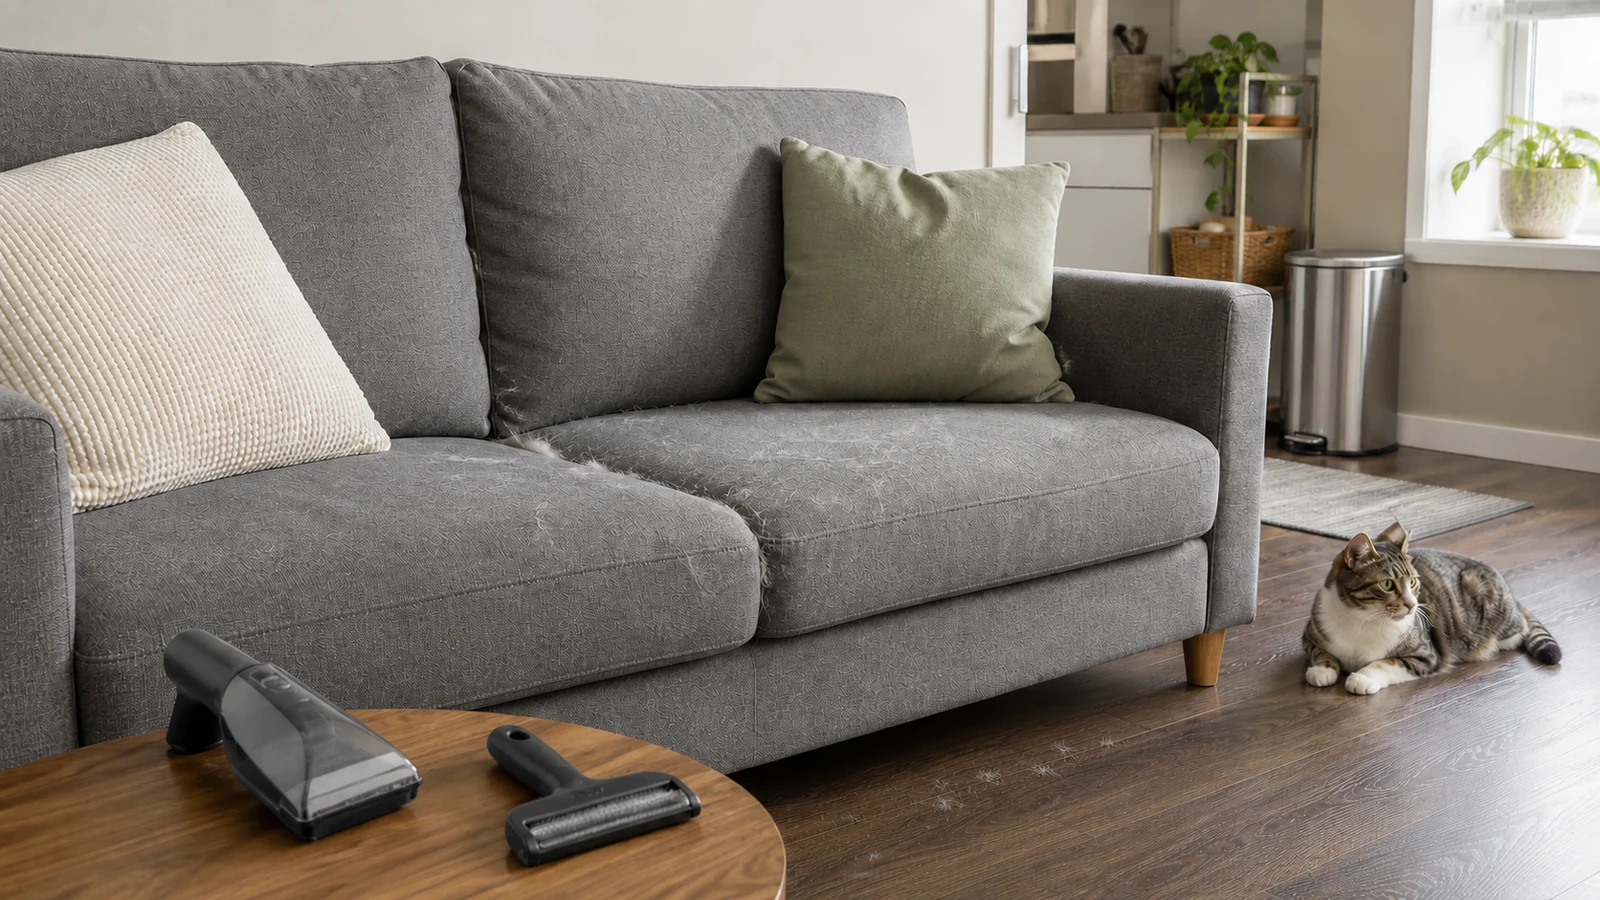
To remove pet hair from furniture without damaging the surface, identify the material first, collect loose hair before working on embedded strands, and choose the least aggressive compatible tool. Finish by cleaning seams, containing the collected debris, cleaning the tool, and picking up anything that fell to the floor. The best method for a tightly woven sofa may be a poor choice for velvet, leather, loose-knit upholstery, or a removable cover.
That distinction matters even more in an apartment. A single sofa may serve as the main seating area, guest space, work spot, and a pet’s favorite resting place. Furniture may sit close to a wall, hair may drop directly onto a hard floor, and there may be no balcony or yard where you can shake out a cover. Cleaning only the visible cushion can move the problem to your clothes, the floor, a pet bed, or the tool you put back in a closet.
Use a controlled sequence instead:
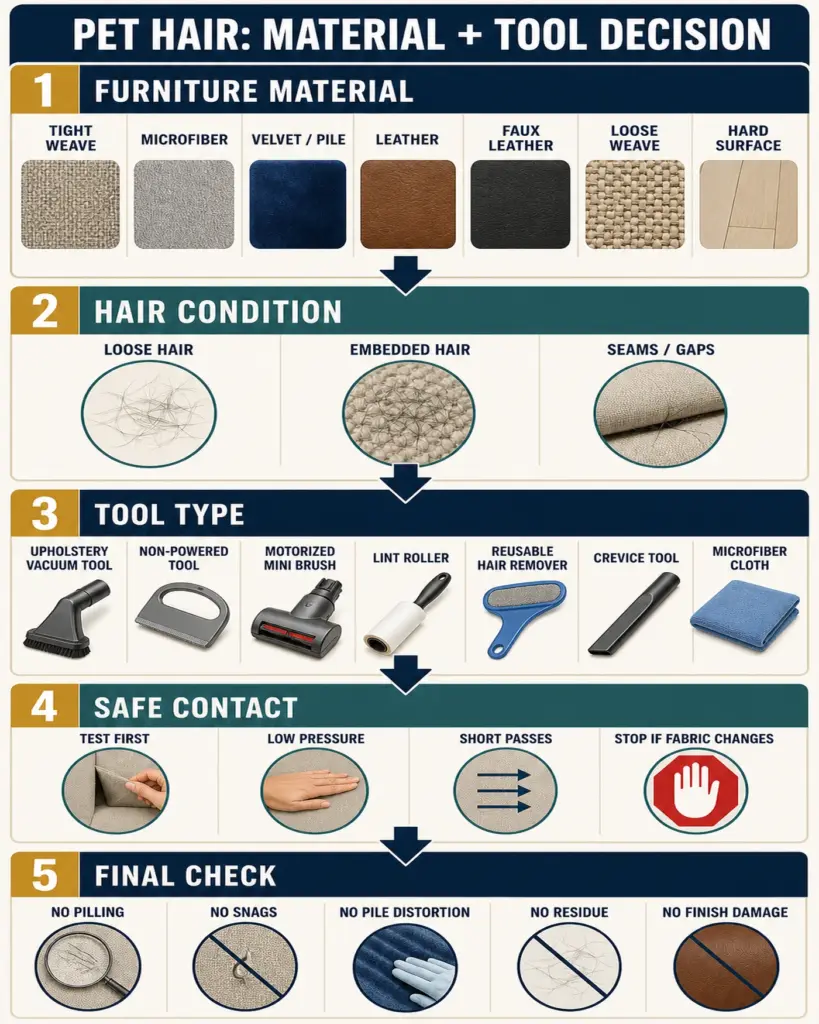
MATERIAL → HAIR LOAD → LOOSE OR EMBEDDED → SAFE TOOL CONTACT → SEAMS / CREVICES → RE-TRANSFER CONTROL → TOOL RESET → FINAL CHECK
Quick Answer
Start with the furniture’s care label, cleaning code, or manufacturer instructions. Remove cushions when the design allows, then collect loose hair with a compatible upholstery attachment, soft brush, or other low-contact tool. If hair remains embedded, test a suitable contact tool in a hidden area and use short, controlled passes. Stop immediately if the tool catches threads, changes the pile, pills the fabric, pulls loops, marks the finish, or leaves residue.
Do not assume that rubber, adhesive rollers, damp sponges, or motorized brushes are safe for every surface. Treat seams and cushion gaps separately with a crevice tool or narrow compatible tool. Put collected hair directly into a bag or bin, clean the floor below, clean the tool, and store it only after it is free of hair and ready for the next use.
Table of Contents
Start With the Furniture Material
The material decides what “gentle” actually means. A method can look harmless while still changing a velvet pile, catching a knitted loop, leaving adhesive on a textile, abrading a coated surface, or pushing moisture into a material that should remain dry.
Look for a sewn-in care label, cleaning code, product manual, or care page for the exact furniture. Codes and instructions can restrict water-based cleaning, solvent use, brushing, vacuum attachments, and professional-cleaning requirements. The La-Z-Boy fabric and leather care guidance illustrates why the code and material must be identified before adding moisture or a cleaner. Hair removal is usually a dry-soil task, but the tool still makes physical contact with the surface.
If you cannot identify the material, begin with the lowest-contact dry option and a hidden-area test. An inconspicuous test does not guarantee that a method is safe across the whole item, but it can reveal immediate catching, color transfer, pile change, residue, or surface marking before the damage occurs in the center of a cushion.
| Furniture Material | Sensible First Approach | Escalation Only If Compatible | Main Stop Signal |
|---|---|---|---|
| Tightly woven upholstery | Soft upholstery attachment or gentle non-powered pickup | Controlled fabric-contact tool in a hidden test area | Pilling, fuzzing, color transfer, or seam distortion |
| Microfiber | Check the exact care code; begin with low-contact dry pickup | Material-compatible brush or remover after testing | Water mark, texture change, residue, or nap distortion |
| Velvet or pile fabric | Follow pile direction with a soft nozzle or care-approved brush | Manufacturer-approved treatment only | Flattened, streaked, crushed, or uneven pile |
| Leather | Soft attachment or clean, soft, lint-free cloth as the care instructions allow | Only the exact material-care method specified | Finish change, discoloration, tackiness, or abrasion |
| Faux leather | Gentle dry pickup following the exact product instructions | Care-approved light contact only | Coating wear, peeling, cracking, or shine change |
| Removable fabric cover | Remove loose hair while supported; read the label | Remove and clean only as the label permits | Stretching, zipper stress, shrink risk, or uncertain washability |
| Knitted or loose-weave upholstery | Very low-snag dry pickup | Soft non-powered contact after a hidden test | Pulled loops, catches, stretched openings, or fuzzing |
| Wood or hard furniture | Compatible dry microfiber cloth or soft dusting attachment | Finish-approved care method | Scratching, dulling, streaking, or moisture at joints |
| Mixed-material furniture | Divide the item into material zones | Treat each zone under its own instructions | One method crossing onto an incompatible component |
Tightly Woven Upholstery
Tightly woven upholstery often allows controlled dry pickup because the yarns present a relatively even surface. Begin by vacuuming or lifting loose hair rather than grinding it into the weave. Move in overlapping passes and check the collection tool frequently. A full roller or hair-loaded brush stops collecting efficiently and starts redistributing strands.
Embedded hair may need light directional contact to gather it into small lines or clumps before removal. Keep the pressure low. If the surface begins to fuzz, the tool is acting on the textile rather than only on the hair.
Microfiber
“Microfiber” is not one universal cleaning code. Construction, backing, finish, dye, and restrictions differ. La-Z-Boy’s performance fabric care page lists multiple micro-denier constructions and cleaning codes. Begin with dry pickup, but test any contact tool before broad use.
Avoid treating a damp sponge as the default answer. Moisture can change the appearance of some fabrics or create a visible boundary as it dries. If the exact instructions permit a damp method for a different cleaning problem, follow those instructions; do not infer that permission from the word microfiber alone.
Velvet or Pile Fabric
Velvet and other pile fabrics have a directional surface. A tool can remove hair while also changing how the pile lies, which makes the cleaned patch look lighter, darker, streaked, or flattened. Follow the direction recommended for the exact fabric and use a soft nozzle or care-approved brush. Do not infer a brushing direction or moisture method from another velvet item; use the instructions for the exact cover.
Do not use a motorized brush, rubber edge, damp sponge, or adhesive roller simply because it worked on another sofa. If the pile changes and does not recover with the approved light method, stop rather than repeating passes.
Leather
Hair usually sits on top of leather instead of embedding in a woven structure, so strong friction is rarely the first need. Use a soft attachment without scraping the surface, or a clean, soft, lint-free cloth if the exact care guidance permits it. Keep attention on stitching, cushion junctions, and the space beneath removable cushions.
Do not assume that all leather can be damp-wiped. Leather finishes and care restrictions differ. Avoid improvised detergents, polish, oil, saddle soap, or conditioning products unless the furniture manufacturer calls for them. Some manufacturers explicitly restrict these substances for particular leather collections, showing why a generic leather rule is unreliable.
Faux Leather
Faux leather can also release surface hair easily, but its coating introduces different failure modes. A rough tool or repeated rubbing can change gloss, wear an edge, or worsen an area that has begun to peel. Begin with gentle dry removal, support seams rather than pulling across them, and follow the exact care instructions for any wiping method.
Do not use a leather-care product merely because the surface looks similar to leather. The compatible product and moisture boundary depend on the actual synthetic material and finish.
Loose-Weave or Knitted Upholstery
Loose weaves, loops, and knitted covers require snag control. Inspect the tool before contact: a chipped plastic edge, exposed hook, stiff rubber ridge, rotating brush, or damaged lint-roller housing can catch a thread. Keep suction and pressure appropriate for the furniture instructions, work slowly, and avoid dragging across decorative yarns.
If a loop lifts, stop. Do not cut, pull, or push it back based on a generic online tip; consult the furniture instructions or an upholstery professional if repair is needed.
Hard Furniture Surfaces
Pet hair on wood shelves, chair frames, laminate side panels, metal legs, or other hard components is usually a surface-transfer problem. Use a clean, compatible dry microfiber cloth or soft dusting attachment and fold or clean the cloth as it loads. Wiping an entire room with one hair-covered cloth simply transfers the hair.
Respect the finish. Avoid dragging gritty crumbs under the cloth, and do not add water around joints, veneer edges, or unfinished areas unless the manufacturer allows it.
Mixed-Material Furniture
A sofa can combine woven upholstery, wood legs, metal hardware, coated trim, leather panels, piping, hook-and-loop fasteners, and a removable cover. Map those zones before starting. Finish the broad textile area, switch or clean tools, and then handle hard components. Do not carry a damp or residue-bearing tool from one material onto another.
Step 1: Remove Loose Hair First
Loose hair is the portion resting on the surface or caught lightly around texture. Remove it before using friction. Otherwise, a contact tool may press some of it deeper, send it over the furniture edge, or load so quickly that every pass becomes less effective.
Prepare the room before touching the sofa. Move a small bin or lined bag within reach. Clear clean laundry, blankets, electronics, and clothing from the immediate area. If the sofa sits close to a wall, decide whether it can be moved safely without straining flooring, cords, or the furniture frame. If it cannot, plan to use a crevice tool along the accessible gap.
Begin at the highest surface: back cushions, arms, seat cushions, then the platform beneath them. Work toward one collection point. Use slow, overlapping passes with a compatible upholstery attachment or soft pickup tool. Fast back-and-forth strokes tend to throw hair toward the floor or onto your clothing. The IKEA upholstery guide warns that excessive suction can damage a cover, so maximum power is not the automatic setting.
Check the tool after each section. Empty a vacuum bin according to its instructions before airflow is impaired, remove wrapped hair from a non-powered tool, and expose a fresh lint-roller section when the used one stops collecting. Put debris directly into containment rather than creating a pile on the coffee table.
Step 2: Decide Whether the Hair Is Embedded
After loose pickup, look across the surface in side light and pass a clean hand just above it without rubbing. Remaining strands may be tucked into texture, aligned with the weave, wrapped around pills, or trapped where a pet’s weight and movement press them into the fabric.
Embedded hair does not automatically call for the strongest tool. First classify what is holding it: surface friction, a directional pile, loops, oily residue, pills, or a seam. Then choose a compatible contact method. Use short strokes in one direction and collect each small row of hair before continuing.
| Hair Condition | First Action | Escalation | Stop or Handoff Point |
|---|---|---|---|
| Loose surface hair | Low-contact dry pickup from top to bottom | Repeat with a clean attachment or tool | Tool begins redistributing more hair than it collects |
| Embedded hair | Hidden-area test with a compatible contact tool | Short directional passes with frequent pickup | Fabric pills, pulls, distorts, or changes appearance |
| Seam, piping, or gap hair | Open the gap gently and use a narrow tool | Remove cushions only if designed to be removed | Tool stresses stitching or cannot enter without force |
| Hair on a removable cover | Support the cover and remove dry hair first | Follow label to clean in place or remove | Removable status or cleaning instructions are uncertain |
| Hair mixed with crumbs or dust | Collect dry particles and hair before any allowed wet care | Separate tools if grit could scratch | Moisture would turn debris into residue or spread it |
| Hair returning from other zones | Contain current debris and clean transfer points | Address floors, bedding, clothing, and resting areas | Repeated furniture cleaning is not changing the pattern |
A bright flashlight held at a low angle can help reveal strands without adding a product. Look around button tufts, piping, zipper lines, the front edge of seats, and the contact zone where a pet leans against an arm. The goal is to find the holding point, not to scrub the entire sofa repeatedly.
Step 3: Match the Tool to the Furniture Material
An upholstery attachment is often the first vacuum category to consider for compatible fabric because it supports broad, controlled passes. A handheld vacuum can make a narrow apartment setup easier, but its attachment, suction, exhaust direction, bin, and maintenance still determine how it behaves. If you need to choose a primary machine rather than use one you already own, the small-apartment vacuum guide covers that buying decision.
A motorized mini brush can agitate embedded hair on some durable upholstery. It can also catch loops, pull threads, disturb pile, or abrade a delicate surface. Use it only when the furniture guidance and tool design support the contact. Herman Miller’s textile care instructions prohibit rotary-brush attachments for several listed textiles because brushing can change the nap or character. “Pet tool” does not prove compatibility with every sofa.
Non-powered upholstery tools, fabric removers, and rubber-contact tools can gather hair through friction. That makes pressure, edge condition, and material compatibility important. A tool that catches should be lifted away, not dragged through the snag.
Lint rollers are convenient for small, compatible areas and final pickup, especially when storage is limited. They create waste, fill quickly under a heavy hair load, and may leave residue or pull at unstable fibers. A reusable remover reduces disposable sheets but needs a reliable cleaning and storage routine.
Upholstery brushes can align or collect hair on suitable fabric, yet brush stiffness and stroke direction matter. Microfiber cloths are useful primarily on compatible hard surfaces, not as a universal upholstery method. Crevice tools belong at seams and gaps, where broad tools cannot maintain contact.
Step 4: Clean Seams, Piping, and Cushion Gaps
Seams need their own pass because broad surface cleaning often pushes hair toward them. Remove cushions only if the furniture is designed for removal. Support each cushion with both hands and place it on a clean surface; do not lean it against clothing or bedding that will return hair later.
Open a gap with your fingers only as far as the furniture naturally allows. Guide a crevice tool along the channel without scraping piping or pulling the seam. For a non-vacuum method, use a narrow, smooth, compatible tool to bring debris toward the opening, then contain it immediately.
Pay attention to the exhaust from a handheld or vacuum. In a tight sofa-wall gap, exhaust can blow light hair beneath the furniture or across a hard floor. Reposition the machine, shorten the pass, or place containment nearby rather than chasing airborne strands around the room.
Hair mixed with crumbs needs dry removal before any care-approved damp process. Grit dragged beneath a tool can abrade leather, faux leather, wood, or coated trim. If a liquid spill, odor, stain, pest issue, or biological contamination is present, stop treating it as a hair-only task and follow the appropriate material-specific cleaning guidance.
Step 5: Handle Removable Cushion Covers
“Removable” describes construction, not washability. A zippered cover may still require cleaning in place or professional care. Removing it without instructions can stress a zipper, distort the fill, or make refitting difficult. La-Z-Boy’s performance fabric care guidance includes codes under which cushion covers should not be removed and laundered. A zipper alone is not permission to wash.
Remove as much dry hair as possible while the cover is supported. Then read the sewn-in label and product instructions. Either clean it in place as directed or remove it appropriately and follow its care process. For general hair-removal mechanics after an item is approved for laundry, use the pet-hair laundry guide rather than improvising a wash method here.
Vacuum Tool vs Non-Vacuum Tool
Neither category wins for every furniture surface. The choice depends on material, hair condition, gap access, noise, debris containment, and how much maintenance the apartment can support.
| Tool Category | Best Use | Poor Fit | Material Risk | Reset Burden |
|---|---|---|---|---|
| Upholstery vacuum attachment | Broad loose-hair pickup on compatible upholstery | Tight gaps or fabric that cannot tolerate the attachment | Excess suction, rough bristles, edge abrasion | Remove wrapped hair; maintain tool and vacuum as directed |
| Handheld vacuum with compatible tool | Quick local pickup, cushions, seams, compact storage | Long sessions, tiny bins, exhaust-sensitive gaps | Same contact risks as its attachment; heat or force from repetition | Empty bin, clear tool, maintain filters as directed, store charger safely |
| Motorized mini brush | Embedded hair on manufacturer-compatible durable fabric | Velvet, loose loops, delicate weave, unstable surface | Snagging, thread pull, pile change, abrasion | Remove wraps with power disconnected as instructed; clean housing |
| Non-powered contact tool | Controlled directional gathering on tested fabric | Fragile, loose, pilling, or catch-prone surfaces | Friction, pilling, residue, pulled loops | Remove hair after each section; wash only if the tool permits |
| Lint roller | Small compatible zones and final visible strands | Heavy loads, unstable textiles, large sofas | Adhesive residue or fiber pull | Replace sheet and contain it immediately |
| Reusable hair remover | Repeated dry pickup with less disposable waste | Material that catches or changes under friction | Abrasion, pile disruption, snagging | Remove trapped hair; clean and fully reset before storage |
| Upholstery brush | Directional pickup or pile-aware care when approved | Unknown pile direction or delicate decorative yarns | Texture change, fuzzing, snagging | Pull hair from bristles and store clean |
| Microfiber cloth | Compatible hard surfaces and frames | Textile upholstery unless specifically suitable | Trapped grit can scratch; dampness may harm finish | Fold to a clean face, launder appropriately, dry before storage |
| Crevice tool | Seams, piping edges, cushion gaps, wall-side channels | Areas where the nozzle stresses stitching or cannot fit | Scraping, seam tension, debris pushed deeper | Clear the nozzle and inspect its edge |
Motorized Brush vs Non-Powered Contact Tool
A motorized brush supplies repeated mechanical action. That can reduce effort on a compatible, durable surface, but it also repeats any bad contact quickly. Inspect the fabric first. Avoid loose threads, fringe, decorative loops, damaged seams, and pile fabrics unless the exact guidance permits the tool. Keep fingers, pet fur, and loose clothing away from moving parts, and follow the vacuum instructions before clearing a jam.
A non-powered tool gives you more direct feedback. You can feel resistance and stop sooner, but manual control does not make the tool automatically safe. High hand pressure and repeated passes can still pill fabric or pull loops. Use the minimum contact that moves the hair, clean the tool often, and reassess if the same patch needs many passes.
Lint Roller vs Reusable Hair Remover
Choose a lint roller for a small finishing area when the textile tolerates the adhesive and immediate containment matters. It may suit an armrest before guests arrive, but it is inefficient for a deeply loaded sectional. Do not press harder after the sheet fills; expose a fresh sheet or switch methods.
Choose a reusable remover when its contact surface is compatible with the furniture and you can clean it after use. Check the edge and texture before every session. Store it in a washable container or defined holder after removing the hair. Do not put a loaded tool into a drawer with clean cloths, remotes, or linens.
How to Remove Pet Hair From a Sofa Without Spreading It Everywhere
In a small room, containment is part of cleaning. Close or move clean throws and clothing away from the work zone. Put a bag or bin beside the sofa. Work from the upper back toward the seat, then from the seat toward a controlled collection edge. Complete one cushion before moving to the next.
Do not brush hair onto the floor as the primary plan. Some strands will fall, but deliberate containment reduces the second cleanup. When hair does fall onto hard flooring, avoid walking through it or rolling a chair over it. Finish the sofa, then collect the floor below before carrying cushions or tools through the apartment.
If the sofa is also used for sleeping, protect clean bedding from the work zone and change clothing if it has collected a heavy layer. If the pet returns during cleaning, pause and contain exposed piles so the animal does not redistribute them.
Why Pet Hair Keeps Coming Back
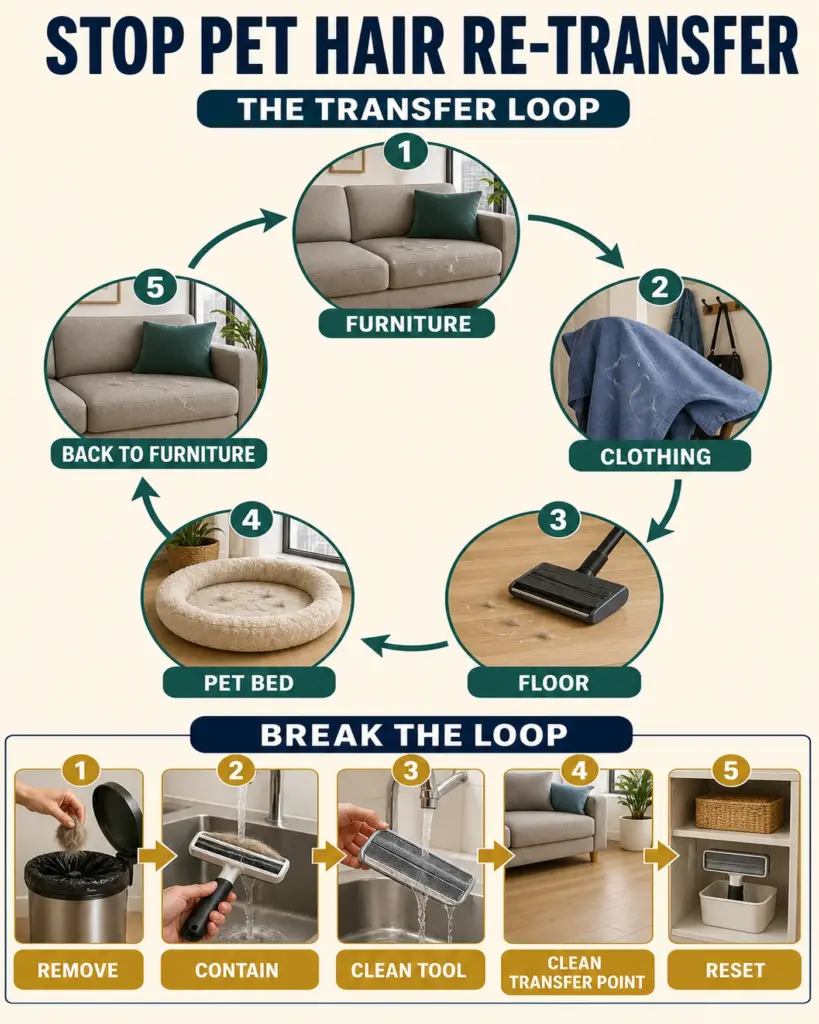
Furniture is one transfer point in a larger apartment system. Hair can arrive on a pet, clothing, blankets, bedding, slippers, airflow, or a cleaning tool. It can fall from the sofa to the floor and return on socks. A throw can move from the sofa to the bed. A reusable remover can leave a clean cushion carrying the hair it collected from the previous one.
Static can contribute to cling, but it is not the only mechanism. Textile electrostatic behavior varies with material, friction, moisture, temperature, and environmental conditions. Research on electrostatic behavior in textile materials supports treating static as variable rather than prescribing one universal humidity target.
Do not apply dryer sheets, fabric softener, or a homemade anti-static spray as a universal fix. Residue, moisture, fragrance, or chemical compatibility may conflict with the furniture instructions. Mechanical removal and transfer control remain the safer general framework.
If a visibly clean sofa becomes hairy again very quickly, inspect the transfer route instead of repeating aggressive contact. The apartment pet-hair control system explains how floors, textiles, resting zones, and routines interact without turning this furniture task into a whole-home cleaning project.
Apartment Cleanup Order
Use an order that prevents completed work from being recontaminated:
- Prepare containment. Place a bag or bin nearby, clear clean textiles, and identify where the tools will be reset.
- Clean the furniture from high to low. Complete backs, arms, seats, and the platform beneath removable cushions.
- Clean seams and gaps. Include the wall-side channel and the floor edge that broad tools miss.
- Contain debris. Seal or empty collected hair in the appropriate household waste route. Follow the vacuum instructions when emptying its bin.
- Clean the floor below. Pick up hair and dry debris before walking through the area or replacing throws.
- Check clothing and nearby textiles. Remove transferred hair without placing it back on the sofa.
- Reset every tool. Remove captured hair, clean permitted parts, allow anything washable to dry as directed, and return it to a clean storage location.
- Perform a final side-light check. Look at the main contact zones, seams, floor edge, and tool-storage route.
This is the practical re-transfer loop:
REMOVE → CONTAIN → CLEAN TOOL → CLEAN TRANSFER POINT → RESET
How to Clean and Store Pet-Hair Removal Tools
A tool is not reset merely because the sofa looks clean. Remove hair from attachment bristles, roller edges, crevice nozzles, reusable surfaces, and the outside of the collection bin. Disconnect powered equipment as its manual directs before touching a brush or clearing a blockage.
Do not wash vacuum parts, rollers, adhesive housings, rubber tools, or brushes unless their instructions allow it. If a reusable component can be washed, remove debris first, clean it as directed, and let it reach the required dry condition before enclosed storage or reassembly. A damp tool in a small cabinet can transfer residue to nearby clean items.
Limited storage makes separation more important. Give the furniture tool one home: a washable tray, hook, closed container, or attachment bag appropriate to the item. Keep it away from clean laundry and food items. Do not store a hair-loaded brush loose in the sofa-side basket where it can contaminate blankets or hands.
Empty debris where escaped hair can be contained. For many apartments, that means placing the vacuum bin deep inside a waste bag before opening it, following the machine instructions, then closing the bag. Avoid emptying beside the cleaned sofa, an open window that blows debris back inside, or a pet feeding area.
Common Pet-Hair Furniture Cleaning Mistakes
- Starting with the strongest friction. Loose hair should be collected before embedded hair is worked. More pressure is not a substitute for matching the tool to the material.
- Treating every sofa as the same fabric. Microfiber, velvet, tight weave, loose knit, leather, and faux leather have different contact and moisture risks.
- Assuming a pet-branded tool is universally compatible. Tool labeling does not override the furniture instructions.
- Using a motorized brush over loops or damaged seams. Moving parts can catch a weakness faster than you can react.
- Using rubber or silicone without testing. Friction may gather hair on one textile and distort, abrade, or catch another.
- Pressing a full lint roller harder. Once the adhesive is covered, harder pressure adds risk without restoring collection capacity.
- Adding moisture to make hair clump. Damp methods can conflict with care codes, finishes, dyes, pile, backing, or drying limits.
- Assuming a removable cover is washable. Construction and care permission are separate questions.
- Cleaning only the visible seat. Seams, the cushion platform, wall-side gaps, clothing, and the floor below can return hair quickly.
- Putting away a loaded tool. Hair left on a brush, remover, attachment, or bin becomes the source of the next transfer.
- Turning a hair task into a chemical experiment. Dryer sheets, fabric softener, fragranced spray, or DIY anti-static mixtures are not universal furniture treatments.
- Repeating a damaging pass. A catch, pulled loop, new fuzzing, color change, residue, or pile distortion is a stop signal, not a reason to press harder.
When to Stop
Stop immediately if the tool catches, pulls a thread, raises pills, changes the pile, transfers color, scratches a finish, leaves tacky residue, stresses a seam, or makes a coating look dull or shiny. Remove the tool without dragging it farther and reassess the material and instructions.
Also stop when the task is no longer dry pet-hair removal. Unknown stains, urine, vomit, feces, pest evidence, mold-like growth, persistent odor, wet cushion filling, cracked leather, peeling faux leather, damaged seams, and valuable or antique upholstery require a different decision. Do not hide an uncertain contamination problem beneath fragrance or continue rubbing a structurally weak textile.
Contact the furniture manufacturer or an appropriate upholstery professional when the care code is missing, the material cannot be identified, the furniture has a warranty concern, a cover cannot be refitted confidently, or safe low-contact methods do not remove the hair without affecting the surface.
Final Takeaway
The safest way to remove pet hair from furniture is to let the material and hair condition determine the method. Collect loose hair first, escalate cautiously for embedded strands, handle seams separately, and keep removable covers within their care-label boundary. Then contain the debris, clean the floor and nearby transfer points, reset the tool, and inspect the surface again.
In an apartment, that complete loop matters more than owning many gadgets. One compatible tool that is used deliberately, cleaned after use, and stored without recontaminating the room is more useful than a drawer of aggressive “hacks” that ignore the furniture itself.