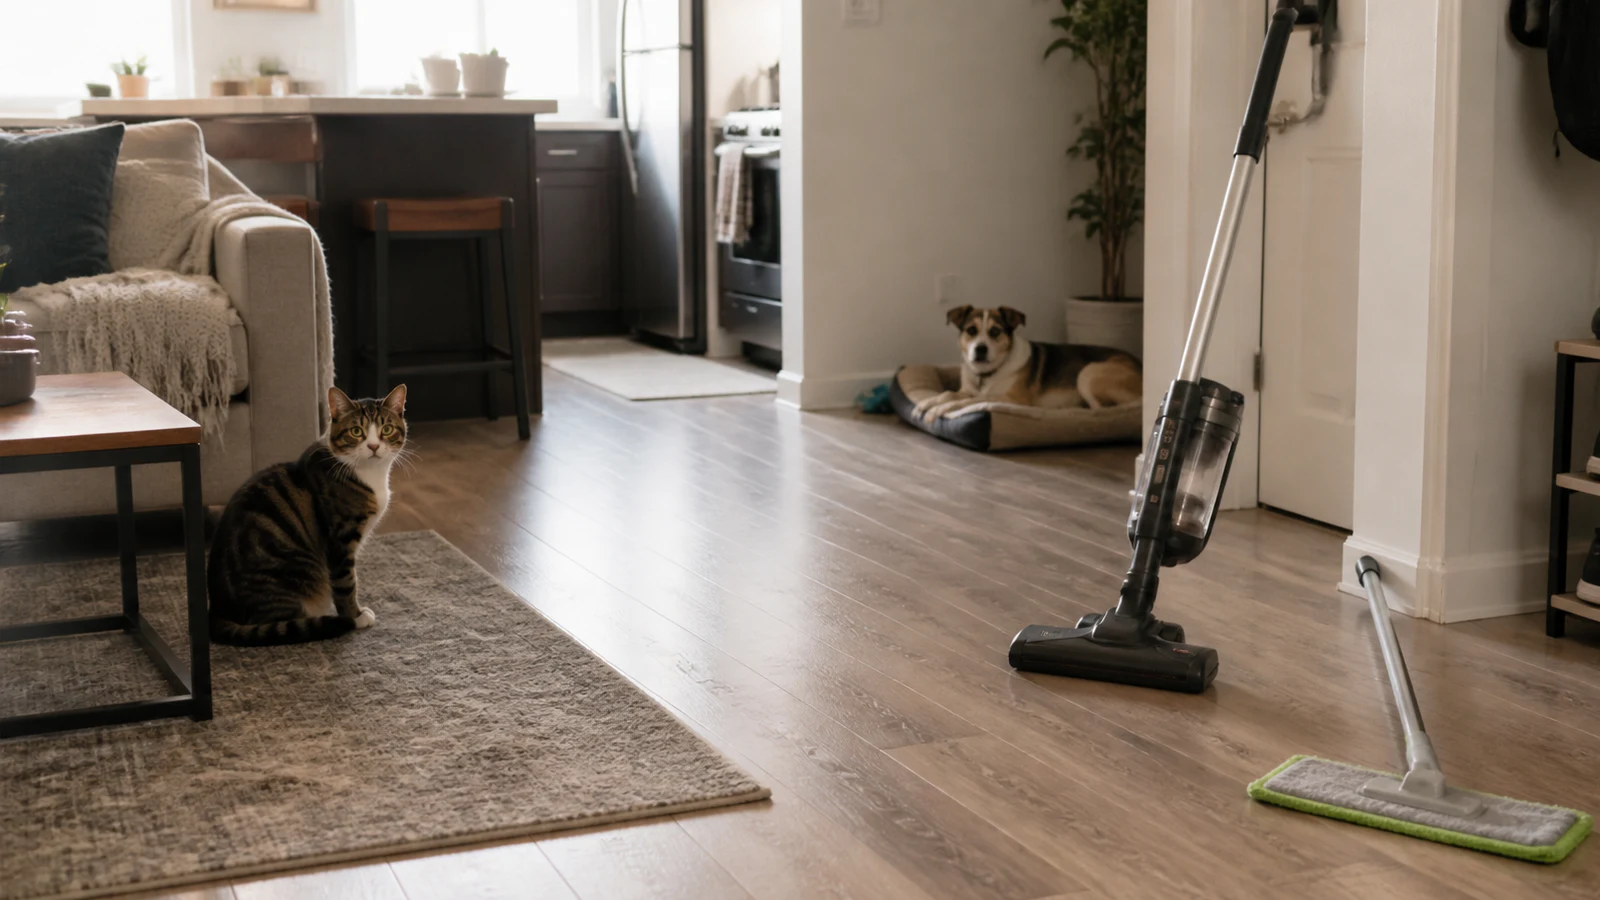
The practical answer to how to keep floors clean with pets is to use the right order for both the surface and the mess: contain an active mess, remove dry debris, spot-clean residue, use compatible wet cleaning only if needed, dry, and recheck transfer points.
“Dry before wet” is useful for loose hair, litter, dust, crumbs, sand, and grit. It does not mean leaving fresh urine, vomit, feces, or a liquid spill on the floor while you vacuum the rest of the apartment. Contain an active wet or biological mess first, block pet traffic, and then continue with the surface-appropriate sequence.
Sealed hardwood, engineered wood, laminate, luxury vinyl, natural stone, tile, carpet, and rugs have different limits for moisture, cleaners, agitation, and steam. Manufacturer instructions and care labels control.
Quick Answer
- Identify the floor type and, if possible, the exact product or finish.
- Contain active liquid or biological mess immediately and keep pets away.
- Remove loose solids, grit, litter, crumbs, and hair with a compatible dry tool.
- Spot-clean only the residue that remains.
- Wet-clean only when the surface and the remaining problem require it.
- Use the least amount of compatible moisture that completes the job.
- Work toward an exit or already-clean zone so you do not cross the treated floor.
- Let the area dry and follow the cleaner label before allowing pet access.
- Clean and dry the tools, then return rugs, mats, and beds only when the floor is ready.
- Recheck paws, pet bedding, entry mats, litter mats, and cleaning tools if dirt returns quickly.
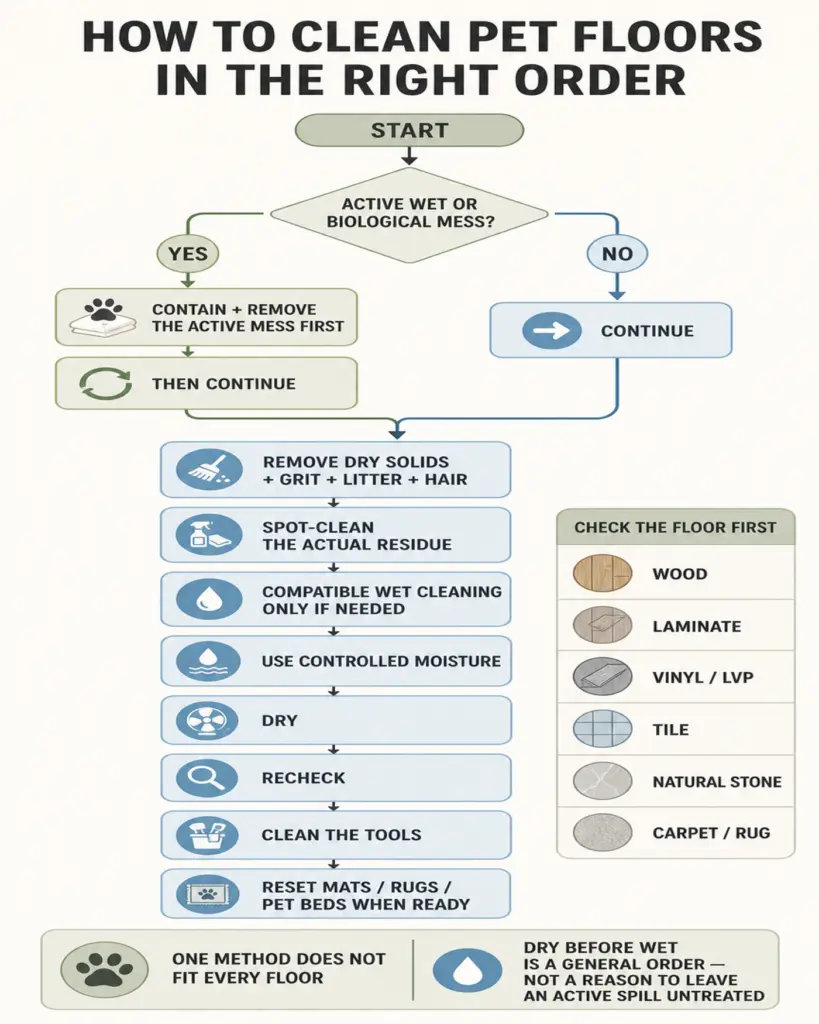
Table of Contents
| Floor Type | Dry Removal | Wet Cleaning Boundary | Main Pet Risk | Avoid |
|---|---|---|---|---|
| Sealed hardwood | Soft broom, dust mop, or suitable bare-floor vacuum | Finish-approved cleaner; minimal moisture | Grit scratches, liquid at seams, worn finish | Wet mops, standing water, unapproved steam |
| Engineered wood | Soft dry tool approved for the finish | Exact product instructions control | Edge penetration, finish damage, core moisture | Assuming every plank is waterproof |
| Laminate | Sweep or vacuum with a suitable hard-floor setting | Slightly damp method only if approved | Swollen seams, grit abrasion | Flooding; steam without exact approval |
| Vinyl / LVP | Sweep or suitable vacuum | Compatible damp cleaning; control liquid at edges | Grit, residue film, moisture at transitions | Abrasives, unapproved wax or polish |
| Ceramic / porcelain tile | Sweep or vacuum loose grit | Tile-, grout-, and sealer-compatible cleaning | Dirty grout, slippery residue | Treating grout like glazed tile; routine acid advice |
| Natural stone | Clean untreated dust mop or scratch-safe vacuum | Stone-compatible, pH-appropriate method | Acid etching, scratching, sealer damage | Vinegar, lemon, acidic DIY cleaners |
| Carpet | Suitable vacuum after dry solids are removed | Targeted spot method; avoid overwetting | Spreading, residue, slow drying, deeper contamination | Scrubbing or soaking an unknown construction |
| Area rugs | Tool compatible with fiber and construction | Care-label method; protect floor below | Dye transfer, backing damage, trapped moisture | Assuming washable, extractable, or steam-safe |
The Best Order for Cleaning Pet Floors
1. Identify the Floor
Do not choose a cleaner from appearance alone. A wood-look plank could be laminate, engineered wood, or luxury vinyl. A stone-look surface could be porcelain, natural stone, or vinyl tile. A rug may use wool, synthetic fibers, natural dyes, latex backing, or a construction that should not be wet-cleaned at home.
Look for a flooring box, manufacturer name, care sheet, rug label, or property-manager record. Inspect the condition too: worn finish, lifted edges, open seams, cracked grout, loose tile, or damaged backing calls for less moisture and agitation. If identification is impossible, start with dry removal and a small compatibility check rather than a universal method.
2. Handle Active Wet or Biological Mess First
Block traffic. Pick up solid or semi-solid material with a suitable tool, then blot or absorb liquid without spreading it. Work from the outside edge inward when that contains the footprint.
This step is source control, not a full-room wet clean. Do not grind solids into carpet, sweep liquid across grout, or push a spill toward plank seams. Bag or contain waste as appropriate, and follow the floor and cleaning-product instructions for the residue that remains.
3. Remove Dry Solids, Grit, Litter, and Hair
Once an active mess is contained—or immediately for a dry mess—remove loose material before adding moisture. Use a soft broom, dust mop, hard-floor head, handheld tool, or compatible vacuum setting. Check tool instructions and stop if it scratches, scatters litter, or pulls rug fibers.
Start around the outside of the dirty zone, then collect the concentrated debris. Pay attention to wall edges, under feeding stands, around litter mats, and beside entry mats. Those boundaries often hold the grit that later travels back across the room.
4. Spot-Clean the Actual Residue
After loose debris is gone, treat the sticky mark, paw print, food film, or remaining spot instead of wet-cleaning the whole room. Apply an approved product according to its label and the surface instructions.
Use clean sections of the cloth as residue transfers. If the mark spreads, the finish changes, dye transfers, or the floor becomes tackier, stop. Repeated application of the wrong product does not become safer because each application is small.
5. Wet-Clean Only When Needed
Wet cleaning is for soil that dry removal and spot treatment did not resolve, not the default finish to every cleanup. Match cleaner, moisture, tool, and rinsing requirement to the floor. Follow dilution instructions; extra concentrate can attract dirt.
Control the working area. A lightly damp pad used in small sections is easier to manage than a saturated mop, especially near seams, transitions, baseboards, and furniture legs. Change a visibly dirty pad rather than redistributing soil.
6. Work Toward an Exit or Clean Zone
Plan before the floor is damp. Move pet items, place supplies within reach, begin at the far side, and finish near a doorway or dry zone.
In an open living room and kitchen, divide the floor into sections instead of trapping yourself behind a wet path. This also makes it easier to keep a pet in a separate safe area without creating a slippery crossing point.
7. Let the Floor Dry
Drying is part of cleaning. Remove excess moisture when instructions permit, ventilate when the label calls for it, and prevent paw traffic. There is no universal drying time; airflow, humidity, surface construction, and product amount change it.
Check seams, grout lines, carpet pile, rug backing, and the floor beneath a rug—not just the top surface. A top that feels dry can hide moisture below.
8. Clean the Tools
Empty debris, remove wound hair, wash only approved components, and dry damp parts appropriately. Dirty pads, packed floor heads, and unrinsed buckets re-soil the next section.
9. Reset Mats, Rugs, and Pet Beds
Return items only when both item and floor are ready. Check the underside of mats, rugs, and pet beds; a damp or dirty item creates a transfer source and can trap moisture.
10. Recheck Transfer Points
If the clean floor quickly shows hair, grit, or marks, trace the pet’s route. Paws, fabric edges, dirty mats, or cleaning tools may be the source. Correct it before repeating a full wet clean.
Why Dry Debris Usually Comes Before Wet Cleaning
Loose pet hair combines with water and cleaning solution into clumps, streaks, or a film that moves from one section to another. Litter can break down into a paste or carry grit farther across the floor. Dust and crumbs become residue under a damp mop. Sand and hard particles can abrade finishes when pushed under a loaded pad.
Dry removal lets a damp cloth or mop contact sticky soil instead of plowing through hair and grit—especially important when one pad can cross several apartment zones.
The exception is an active liquid or biological mess. Contain fresh urine, vomit, feces, water, or another spill immediately. Remove the source, then collect surrounding dry debris without sending a vacuum or reusable tool through contamination it is not designed to handle. The correct rule is “active mess first, then dry debris,” not “always vacuum before doing anything else.”
Match the Method to the Mess
| Mess Type | First Action | Wet Cleaning Needed? | Main Risk | Escalation |
|---|---|---|---|---|
| Hair | Remove with a compatible dry tool | Usually not for hair alone | Clumping and redistribution | Address fabrics or tool buildup if it returns |
| Litter | Collect dry without grinding it | Only for remaining residue | Paste, scattered grit, scratches | Check box and mat path; follow vacuum guidance |
| Mud | Let removable surface soil dry if safe; contain wet tracks | Often targeted damp cleaning | Abrasive grit and spreading | Stop if staining or material damage appears |
| Food | Lift solids first | Often for sticky or oily residue | Smearing into seams or grout | Use surface-approved stain guidance |
| Water | Absorb promptly | Usually no cleaner needed | Seepage, swelling, slipping | Inspect edges or below rugs if water traveled |
| Urine | Contain liquid and block traffic | Product and surface dependent | Odor, seam entry, deeper contamination | Handoff for carpet, padding, or recurring odor |
| Vomit / feces | Remove solids and absorb liquid promptly | Usually targeted response | Spreading and incompatible chemistry | Follow material guidance; seek help if damage persists |
| Unknown sticky residue | Isolate and test conservatively | Only after identification or compatibility check | Finish or dye damage | Stop if the surface changes or residue spreads |
How to Keep Floors Clean With Pets on Different Surfaces
Sealed Hardwood
Confirm that the finish is intact; “hardwood” does not automatically mean sealed or moisture-tolerant. Remove hair and grit with a soft broom, clean dust mop, or suitable bare-floor vacuum that will not scratch.
Wipe spills promptly and use a cleaner made for the floor’s finish. The National Wood Flooring Association maintenance guidance recommends sweeping, dust mopping, or vacuuming on a bare-floor setting, cleaning spills with a dry or slightly damp cloth, and avoiding wet and steam mops. Keep liquid from sitting at board ends, gaps, and worn areas. Do not treat vinegar as a universal wood-floor cleaner, and do not assume that a finish-safe spray for one product is appropriate for another.
Engineered Wood
Engineered wood shares some hardwood principles: gently remove grit, control moisture, wipe spills promptly, and avoid abrasion. But construction, finish, edges, installation, and waterproof claims vary. Do not assume it cleans exactly like hardwood or welcomes water.
Use the exact product guidance. Bruce’s engineered hardwood care guidance advises soft dry tools, limited moisture, and no steam for its engineered wood guidance. Another manufacturer may specify a particular cleaner or damp method. Open seams, chipped finish, or swelling are reasons to stop adding moisture and consult the flooring instructions or property manager.
Laminate
Dry-remove hair and grit, control moisture, and keep liquid from pooling at seams, thresholds, or damaged joints. “Waterproof” does not mean unlimited water or prolonged soaking.
Steam is product-specific. Current Mannington laminate care instructions permit residential steam-based cleaners for its Restoration Collection while also warning not to flood the floor. That limited approval is not a rule for every Mannington line or every laminate brand. Use steam only if the exact flooring manufacturer permits it, and follow the specified equipment and method.
Vinyl / LVP
Sweep or vacuum compatibly, then use an approved damp method when residue remains. Watch seams, cut edges, transitions, and adjacent materials; the wear layer and underlying installation can have different limits.
Avoid abrasive pads and unapproved wax, polish, or “mop and shine” products that can scratch or leave a film. Do not reason that waterproof vinyl makes the amount of water irrelevant. Manufacturer rules also differ on steam: Mannington currently permits specified residential steam use for ADURA Rigid, while Karndean’s current floor-care FAQ does not recommend steam mops or steam cleaners for its LVT. Exact-product instructions win.
Ceramic or Porcelain Tile and Grout
Remove grit first. Glazed ceramic or porcelain can tolerate moisture differently from grout, sealer, cracked joints, stone accents, or adjacent flooring. Treat the installation as a system.
Choose a cleaner compatible with the tile, grout, and sealer. Vinegar is not universal grout advice. MAPEI’s tile and grout guidance notes that regular vinegar use can weaken or discolor cement-based grout and that acid can etch stones such as marble, travertine, and limestone. Grout restoration, cracked joints, and deep discoloration are separate problems; more aggressive scrubbing during routine pet cleanup can worsen them.
Natural Stone
Natural stone is not ceramic tile. Marble, travertine, limestone, and other calcareous stones are acid-sensitive; other stones can contain sensitive minerals. Remove abrasive sand and grit with a clean untreated dust mop or scratch-safe tool.
Then follow stone- and sealer-specific guidance with a pH-appropriate product. The Natural Stone Institute care guide recommends understanding the stone type and warns that lemon, vinegar, and other acids can dull or etch calcareous stone. Do not improvise with acidic DIY recipes. If a pet stain, etch mark, dark patch, or damaged finish remains, stop routine cleaning and consult the stone supplier or a qualified restorer.
Carpet
For carpet, vacuum dry hair and debris but handle active spills first. Lift semi-solids, blot liquid with a clean absorbent cloth, and use a compatible spot product as directed. Blot rather than scrub.
Avoid overwetting. Moisture can spread a stain, leave cleaner residue, slow drying, or travel below the reachable fibers. The Carpet and Rug Institute’s spot-cleaning guidance emphasizes prompt response, absorbing liquid, lifting semi-solids, pretesting a cleaner, and blotting instead of scrubbing. If urine odor returns, the issue may extend beyond routine surface cleaning; use the targeted handoffs below rather than repeatedly soaking the same spot.
Area Rugs
Treat a rug as its own product. Fiber, dye, pile, weave, backing, edges, adhesive, and care label determine whether it can be vacuumed with a brushroll, spot-cleaned, washed, extracted, or steamed.
Do not assume “area rug” means washable or extractable. Test only as the care guidance allows, control moisture, and check for dye transfer or texture change. Lift the rug when appropriate to inspect the floor below, but do not move contamination across the room. A damp rug returned to a dry-looking floor can trap moisture against wood, laminate, vinyl seams, stone, or carpet.
Removing Pet Hair From Floors Without Making a Wet Mess
Hair is usually a dry-removal job. Use a soft broom or dry mop on suitable hard floors, a compatible floor head, or an approved vacuum setting. Work along edges and under furniture.
Do not wet-mop the hair first. Water binds fine hair into ropes and films that cling to pads, grout, baseboards, and plank texture. Empty or clean the tool when airflow drops or the pickup path becomes packed. For a broader room-by-room transfer system, see how to control pet hair in a small apartment. If the missing piece is equipment rather than technique, the apartment pet-hair vacuum guide covers buying decisions without changing this cleaning order.
Control the Litter Tracking Path
Think in a short path: box → mat → first few feet → adjacent floor. Scoop or lift obvious pieces that a tool should not handle, then collect loose litter dry. Do not add water first; damp litter can form paste, carry grit, and lodge in textured floors or seams.
Clean and dry the mat before resetting. Inspect around corners, but do not assume every vacuum handles every litter. Fine dust, dense pellets, wet litter, and large amounts have different limits; follow tool instructions.
Stop Mud at the Entryway
Use a compact sequence: mat → paw dry-off → remove grit → spot damp clean → dry. Contain the wet path near the door instead of letting a pet drag muddy grit through the apartment. Blot or wipe paws with an appropriate clean towel, remove loose grit from the floor and mat, then spot-clean only the marks that remain with the floor-compatible method.
Protect the most moisture-sensitive entry material first. A saturated mat transfers water underneath; move and dry it as allowed, and close the route until the floor is not slippery and the label permits access.
Clean the Feeding Area in the Right Order
Lift kibble, crumbs, or pieces of wet food first. Absorb bowl water instead of pushing it toward plank seams or grout. Then clean sticky or oily residue with the floor-approved product and dry the area.
Check beneath the feeding mat. Replace bowls and mats only when surfaces are ready, and keep pets away as the cleaner label directs. A food-area location does not make a household cleaner automatically suitable around pets.
What If the Mess Is Pet Urine?
On a hard floor, the first boundary is simple: prevent traffic, contain fresh liquid promptly, and avoid driving it into seams, edges, grout, or an adjacent rug. Follow both the floor instructions and the selected product label, use only compatible moisture, dry the area, and inspect nearby joints. If odor or discoloration returns, repeated surface wiping may not reach the source.
Carpet requires a more specific response. Use the guide to remove cat urine smell from apartment carpet for the fresh-versus-old and depth decisions. If contamination may have reached the cushion layer, see how to handle pet urine smell in carpet padding. Before reaching for stronger household chemicals, review what not to use on pet urine smell. Those are separate remediation decisions; this floor routine does not replace them.
Do Not Use One Cleaner on Every Floor
A suitable choice requires surface compatibility + product label + pet access and drying directions. A tile cleaner may damage stone, wood finish, vinyl coating, rug dye, or carpet backing. Even a compatible product can be wrong when over-concentrated, mixed, or accessible to a pet.
Do not use universal recipes built around vinegar, bleach, ammonia, peroxide, essential oils, dish soap, disinfectant, or fragrance. This is not a claim that every one of those ingredients is forbidden in every manufacturer-controlled use. It means none is a universal pet-floor solution, and improvised combinations create avoidable surface, residue, exposure, and mixing risks.
Never mix cleaners. Keep the original label available, follow ventilation and protective-equipment directions, and store products away from pets. The EPA’s pet household-product guidance says to read and follow label precautions and keep pets away from treated areas as directed. Use “pet-safe” only when a precise claim and its conditions are supported; the phrase is not a substitute for reading the label.
Can You Use a Steam Mop in a Pet Apartment?
It depends on the exact floor, not merely the broad floor name. The NWFA warns against steam mops on wood floors. Bruce does not recommend steam for its wood-floor care. Karndean’s current U.S. guidance does not recommend steam mops or steam cleaners on its LVT. By contrast, Mannington currently permits specified residential steam-based cleaning for its Restoration Collection laminate and ADURA Rigid guidance.
Therefore, both “steam is safe on vinyl” and “never steam laminate” are unreliable universal rules. Find the exact product and current care document. Follow equipment and method restrictions; without identification or permission, steam is not the conservative default.
Steam also does not solve every pet mess. Heat, pressure, and moisture do not replace source removal, compatible chemistry, drying, or deeper-contamination assessment. Do not use a steam appliance on a rug, carpet, adhesive, wood product, or plank floor solely because the machine lists a broad surface category.
Pet Access and Drying Are Part of the Job
Keep pets away for the period and conditions stated on the product label. This prevents direct contact, slipping, licking residue from paws, and tracking cleaner into beds or onto furniture. Use a door, gate, closed room, or supervised alternate route that does not make the pet cross the treated zone.
Allow the floor to dry as required and ventilate when directions call for it. Do not put a litter mat, entry rug, feeding mat, laundry basket, or pet bed back onto damp flooring. On carpet and rugs, inspect below the surface. On hard floors, check seams and shaded edges. There is no responsible universal drying time; verify the actual condition and follow the product and material instructions.
Why the Floor Gets Dirty Again So Fast
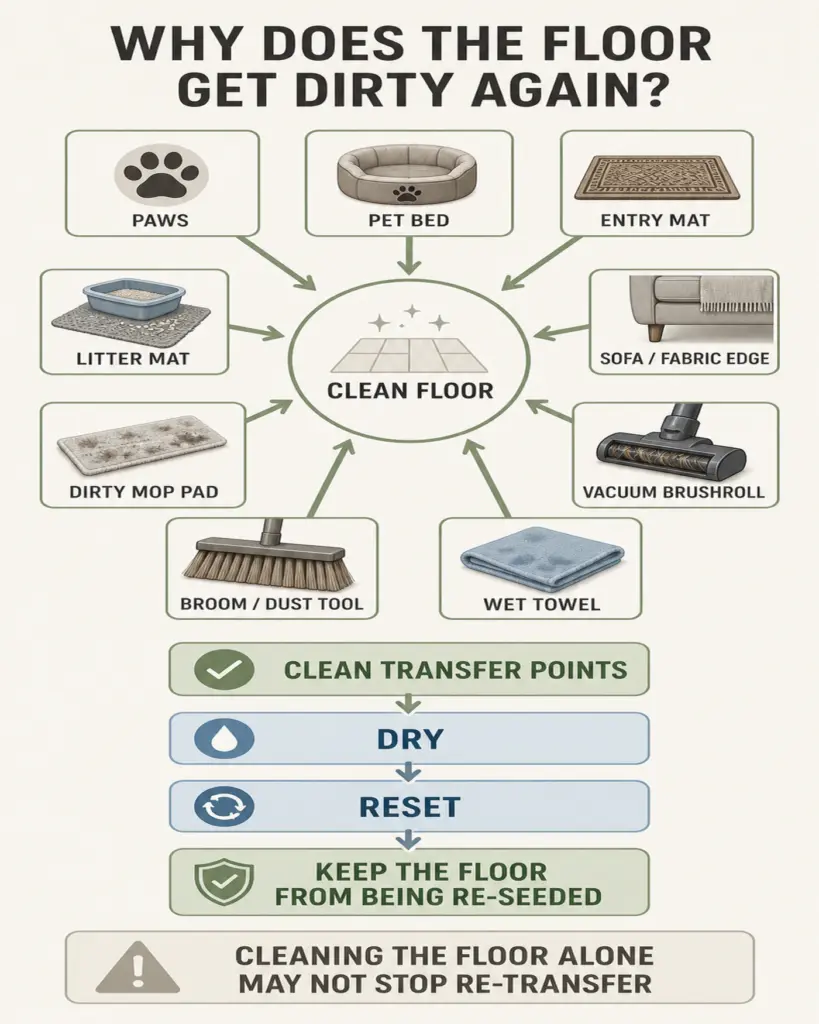
A cleaned floor is quickly re-soiled when a transfer point remains dirty. Paws carry grit; beds release hair; entry and litter mats shed captured debris; sofa edges brush the floor; wet towels and laundry baskets move residue.
Tools transfer soil too. Loaded brushrolls drop hair, packed floor heads scatter debris, sticky brooms stamp dust elsewhere, and used pads or dirty solution create streaks.
Trace the pattern before cleaning again: hair beside a sofa suggests fabric or a resting spot; grit from a box suggests the litter path; door marks suggest the mat; parallel streaks suggest the pad, dilution, or technique. Correct the source, then make one targeted pass.
Clean the Cleaning Tools Too
Empty the vacuum bin as directed, follow bag and filter instructions, remove brushroll hair, and inspect the head and wheels for grit. Never wash electrical or non-washable parts; wash and dry a filter only when the manual allows.
Remove trapped hair and sticky residue from the broom or dry mop. Wash microfiber pads and mop heads only according to their care instructions, avoiding products that interfere with their function. Empty and rinse a bucket after use rather than storing solution in it. Dry reusable components before enclosed storage so the closet does not become a source of odor or residue.
Replace consumables that no longer clean normally. Tool hygiene does not require aggressive disinfection after an ordinary dry-hair job; remove residue, follow washable-part rules, dry components, and avoid carrying the last mess forward.
Apartment Scenarios: Where to Start and When to Stop
| Apartment Scenario | First Priority | Tool Category | Stop Condition |
|---|---|---|---|
| Studio with cat + litter | Contain the box-to-mat tracking path | Litter-compatible dry pickup tool; clean mat | Loose litter and grit are controlled; mat and floor are dry |
| One-bedroom with dog + entryway | Stop wet grit at the door | Absorbent paw towel, dry grit tool, compatible spot cloth | Mud path is contained; no slippery moisture remains |
| Mixed hard floor + area rug | Separate methods at the transition | Hard-floor dry tool plus rug-compatible tool | Both surfaces are clean enough; no moisture is trapped below rug |
| Pet-friendly bedroom | Control hair at bed and fabric edges | Surface-compatible dry hair tool | Loose hair and grit are controlled without wetting unnecessarily |
| Open living room / kitchen | Divide the space and protect a clean exit | Dry tool, clean pads, floor-compatible spot method | Sections are dry and no dirty route crosses the clean zone |
| Multi-pet apartment | Isolate the active source and transfer routes | Source-specific containment plus compatible floor tools | Mess is not spreading; tools and pet routes are reset |
When Is the Floor Clean Enough?
The floor is clean enough when the active mess is removed, loose hair and grit are controlled, sticky residue is gone, and the problem is no longer spreading. There should be no standing moisture or cleaner film. The floor should be drying or dry as its instructions require, and pet re-entry should meet the product label.
Mats, rugs, bowls, and beds should be able to return without trapping moisture or immediately re-soiling the surface. A faint stain, recurring odor, swollen seam, damaged finish, or wet layer below carpet is not a reason to repeat the same routine indefinitely; it is a sign to use the relevant material guidance or escalate the deeper problem. “Clean enough” means the practical floor job is complete, not that every room has been wet-cleaned.
Common Pet-Floor Cleaning Mistakes
- Wet-mopping loose hair first. It turns removable dry material into clumps and streaks.
- Grinding litter or grit into the floor. Hard particles can scratch finishes and travel under pads.
- Flooding seams. Water resistance does not eliminate edge, joint, subfloor, or installation limits.
- Assuming waterproof means unlimited water. Spills still create slipping, transfer, and adjacent-material risks.
- Using steam without exact approval. Guidance differs by manufacturer and product line.
- Mixing cleaners. Combined products can create hazardous reactions or unpredictable surface damage.
- Masking odor with fragrance. Fragrance does not remove a contamination source.
- Replacing rugs before the floor dries. This can trap moisture and restart transfer.
- Using dirty mop pads. A loaded pad redistributes hair, grit, cleaner, and soil.
- Using one cleaner on every floor. Tile, stone, wood, vinyl, carpet, and rug instructions differ.
- Repeated wet cleaning when contamination went deeper. More surface moisture may not reach padding, seams, or subfloor.
- Letting pets cross too early. Paws can contact residue, slip, and track it to other surfaces.
A Practical Final Pass
To keep the process small-apartment friendly, finish where the mess started. Look at the floor, the transfer point, and the tool as one short system. Confirm that the source is contained, loose debris is gone, any residue received a compatible treatment, and no extra moisture remains. Then clean the tool, dry what needs drying, and restore the room without placing a dirty object back onto the floor.
That order prevents the two most common forms of wasted effort: turning dry debris into wet residue and cleaning the floor while leaving the source ready to contaminate it again. Identify the surface, respond to the mess you actually have, and stop when the floor is safe to reset rather than adding unnecessary products or water.
Sources
- National Wood Flooring Association — Maintenance
- Bruce — How to Clean Engineered Hardwood Floors
- Mannington — Laminate Care and Maintenance
- Mannington — ADURA Rigid Care and Maintenance
- Karndean — Frequently Asked Questions: Floor Care and Cleaning
- Natural Stone Institute — Care and Cleaning of Natural Stone
- MAPEI — Can I Use Vinegar to Clean My Tile and Grout?
- Carpet and Rug Institute — Cleaning and Maintenance
- US EPA — Read the Label First: Protect Your Pets